
How to record your telehealth sessions with Mentalyc
Recording your telehealth sessions directly within Mentalyc is a simple and secure way to capture audio for your session notes. This guide will walk you through the entire process, from starting the recording to generating your final note.
Before You Begin: Important Requirements
- Obtain Client Consent: Before your first recording, it is critical to ensure you have obtained informed consent from your client to record the session.
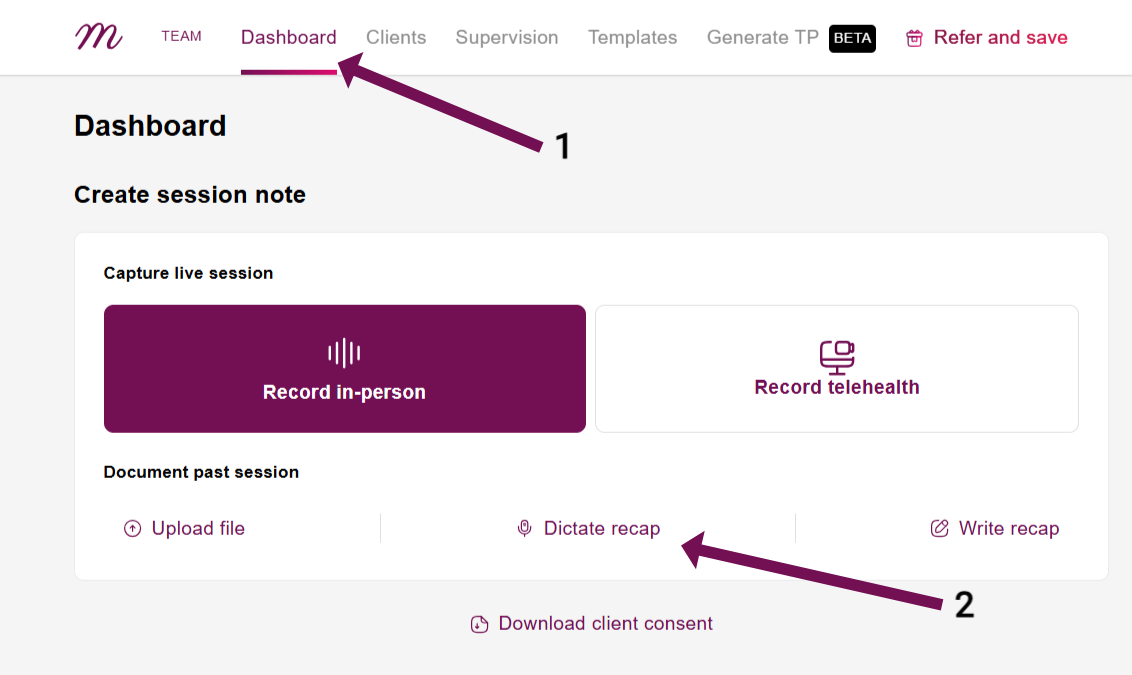
- If a client does not give consent, you can still use the "Dictate Recap" feature. Simply summarize the session verbally, and Mentalyc will generate a note from your dictation.
- A Note on Security: Built-in safety is our priority. The recorder features robust safeguards to preserve your recordings, and it adheres to HIPAA regulations to ensure your client's data remains secure. We are committed to protecting your data within our secure environment. Utilizing third-party tools or apps can cause a data breach.
- Use a Computer: The "Record Telehealth" feature is currently available only on desktop and laptop computers. For a reliable method to record on a mobile device.
- Use an Optimized Browser: This feature is designed to work best with Google Chrome or Microsoft Edge.
Best Practices for High-Quality Audio
The quality of your audio directly impacts the accuracy of the transcription.
1. Optimize Your Environment
For the clearest possible audio, it's best to record in a quiet, private environment to minimize interruptions. If you are in a noisy environment, using a headset with a mic or a dedicated microphone is a great way to drastically reduce echo and background noise for both you and your client. You can also advise your client on this if needed.
2. Quick Start Checklist
Got Consent?
Using Chrome/Edge on a computer?
Is the device's sleep mode off, plugged in, or in best performance mode?
Is the correct microphone selected in Mentalyc?
Ready to share the correct browser TAB and toggle "Share tab audio" ON?
3. Run a Final Test
Finally, before your first live session, we highly recommend you run a test recording. A quick 1-minute mock recording by yourself or with a colleague is the best way to ensure your microphone and audio-sharing settings are working perfectly. Afterward, play back the downloaded audio file to confirm both voices were captured clearly.
Part 1: Starting Your Telehealth Recording
Follow these steps to begin your recording session on a computer.
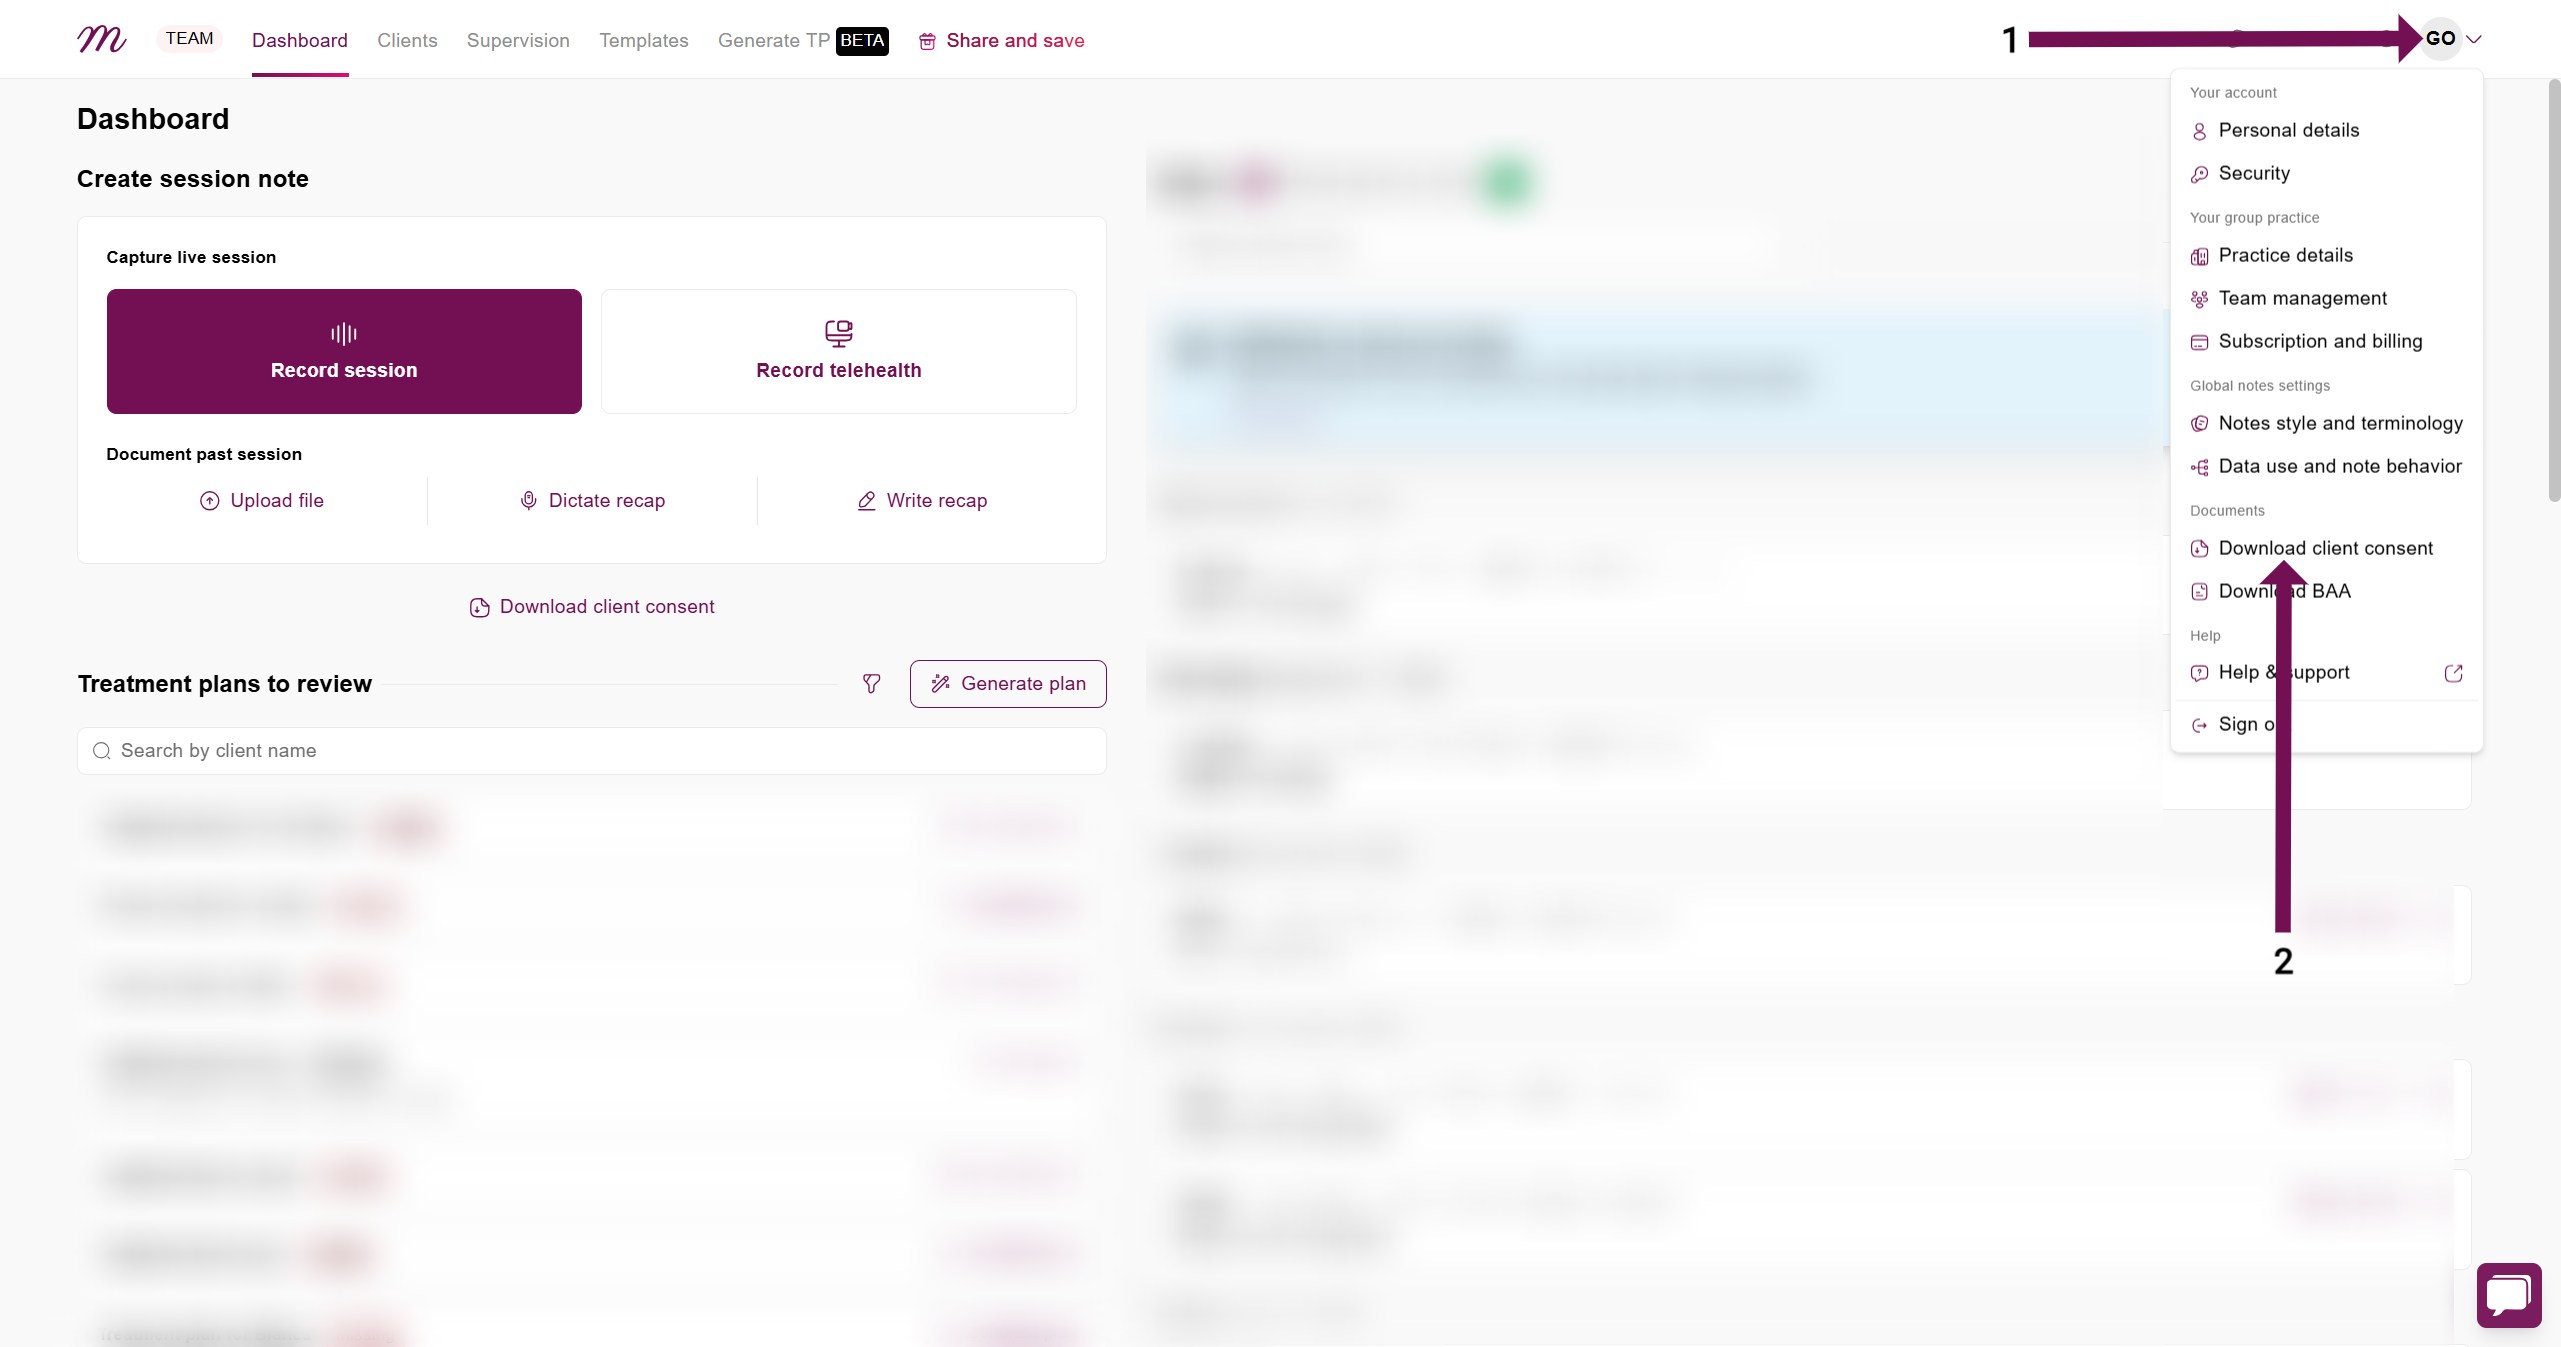
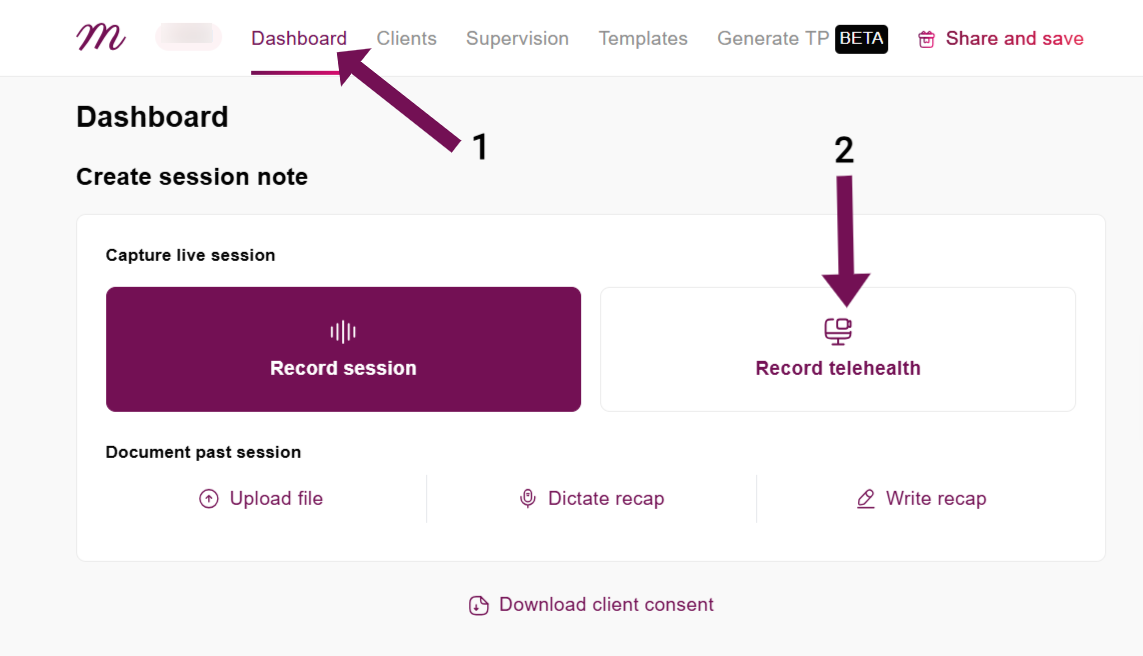
Step 1: Select "Record Telehealth"
- Log in to your Mentalyc account and go to your dashboard.
- In the upload box, click on the Record Telehealth option.
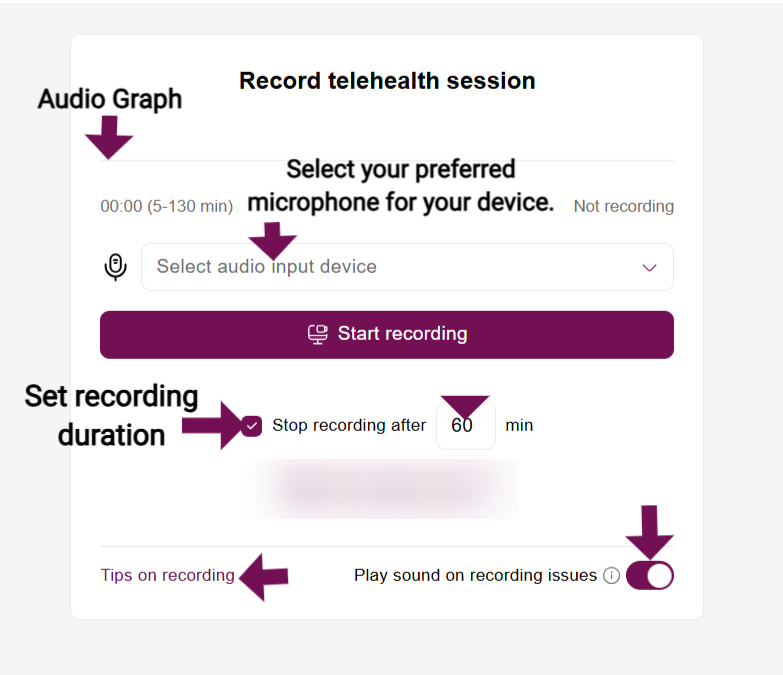
Step 2: Configure Your Recording Settings
- Microphone Selection: Choose your preferred microphone from the dropdown menu (e.g., your external headset, wired microphone, etc.). This is a critical step for quality audio.
- Set Duration (Optional): Check the box for "Stop recording after" and enter the desired number of minutes for the recording to stop automatically.
- Audio Alerts: Keep the "Play sound on recording issues" toggle on to be notified if a problem occurs.
Step 3: Grant Microphone Permission
- Click the Start Recording button.
- In the new instruction window, click Start Recording.
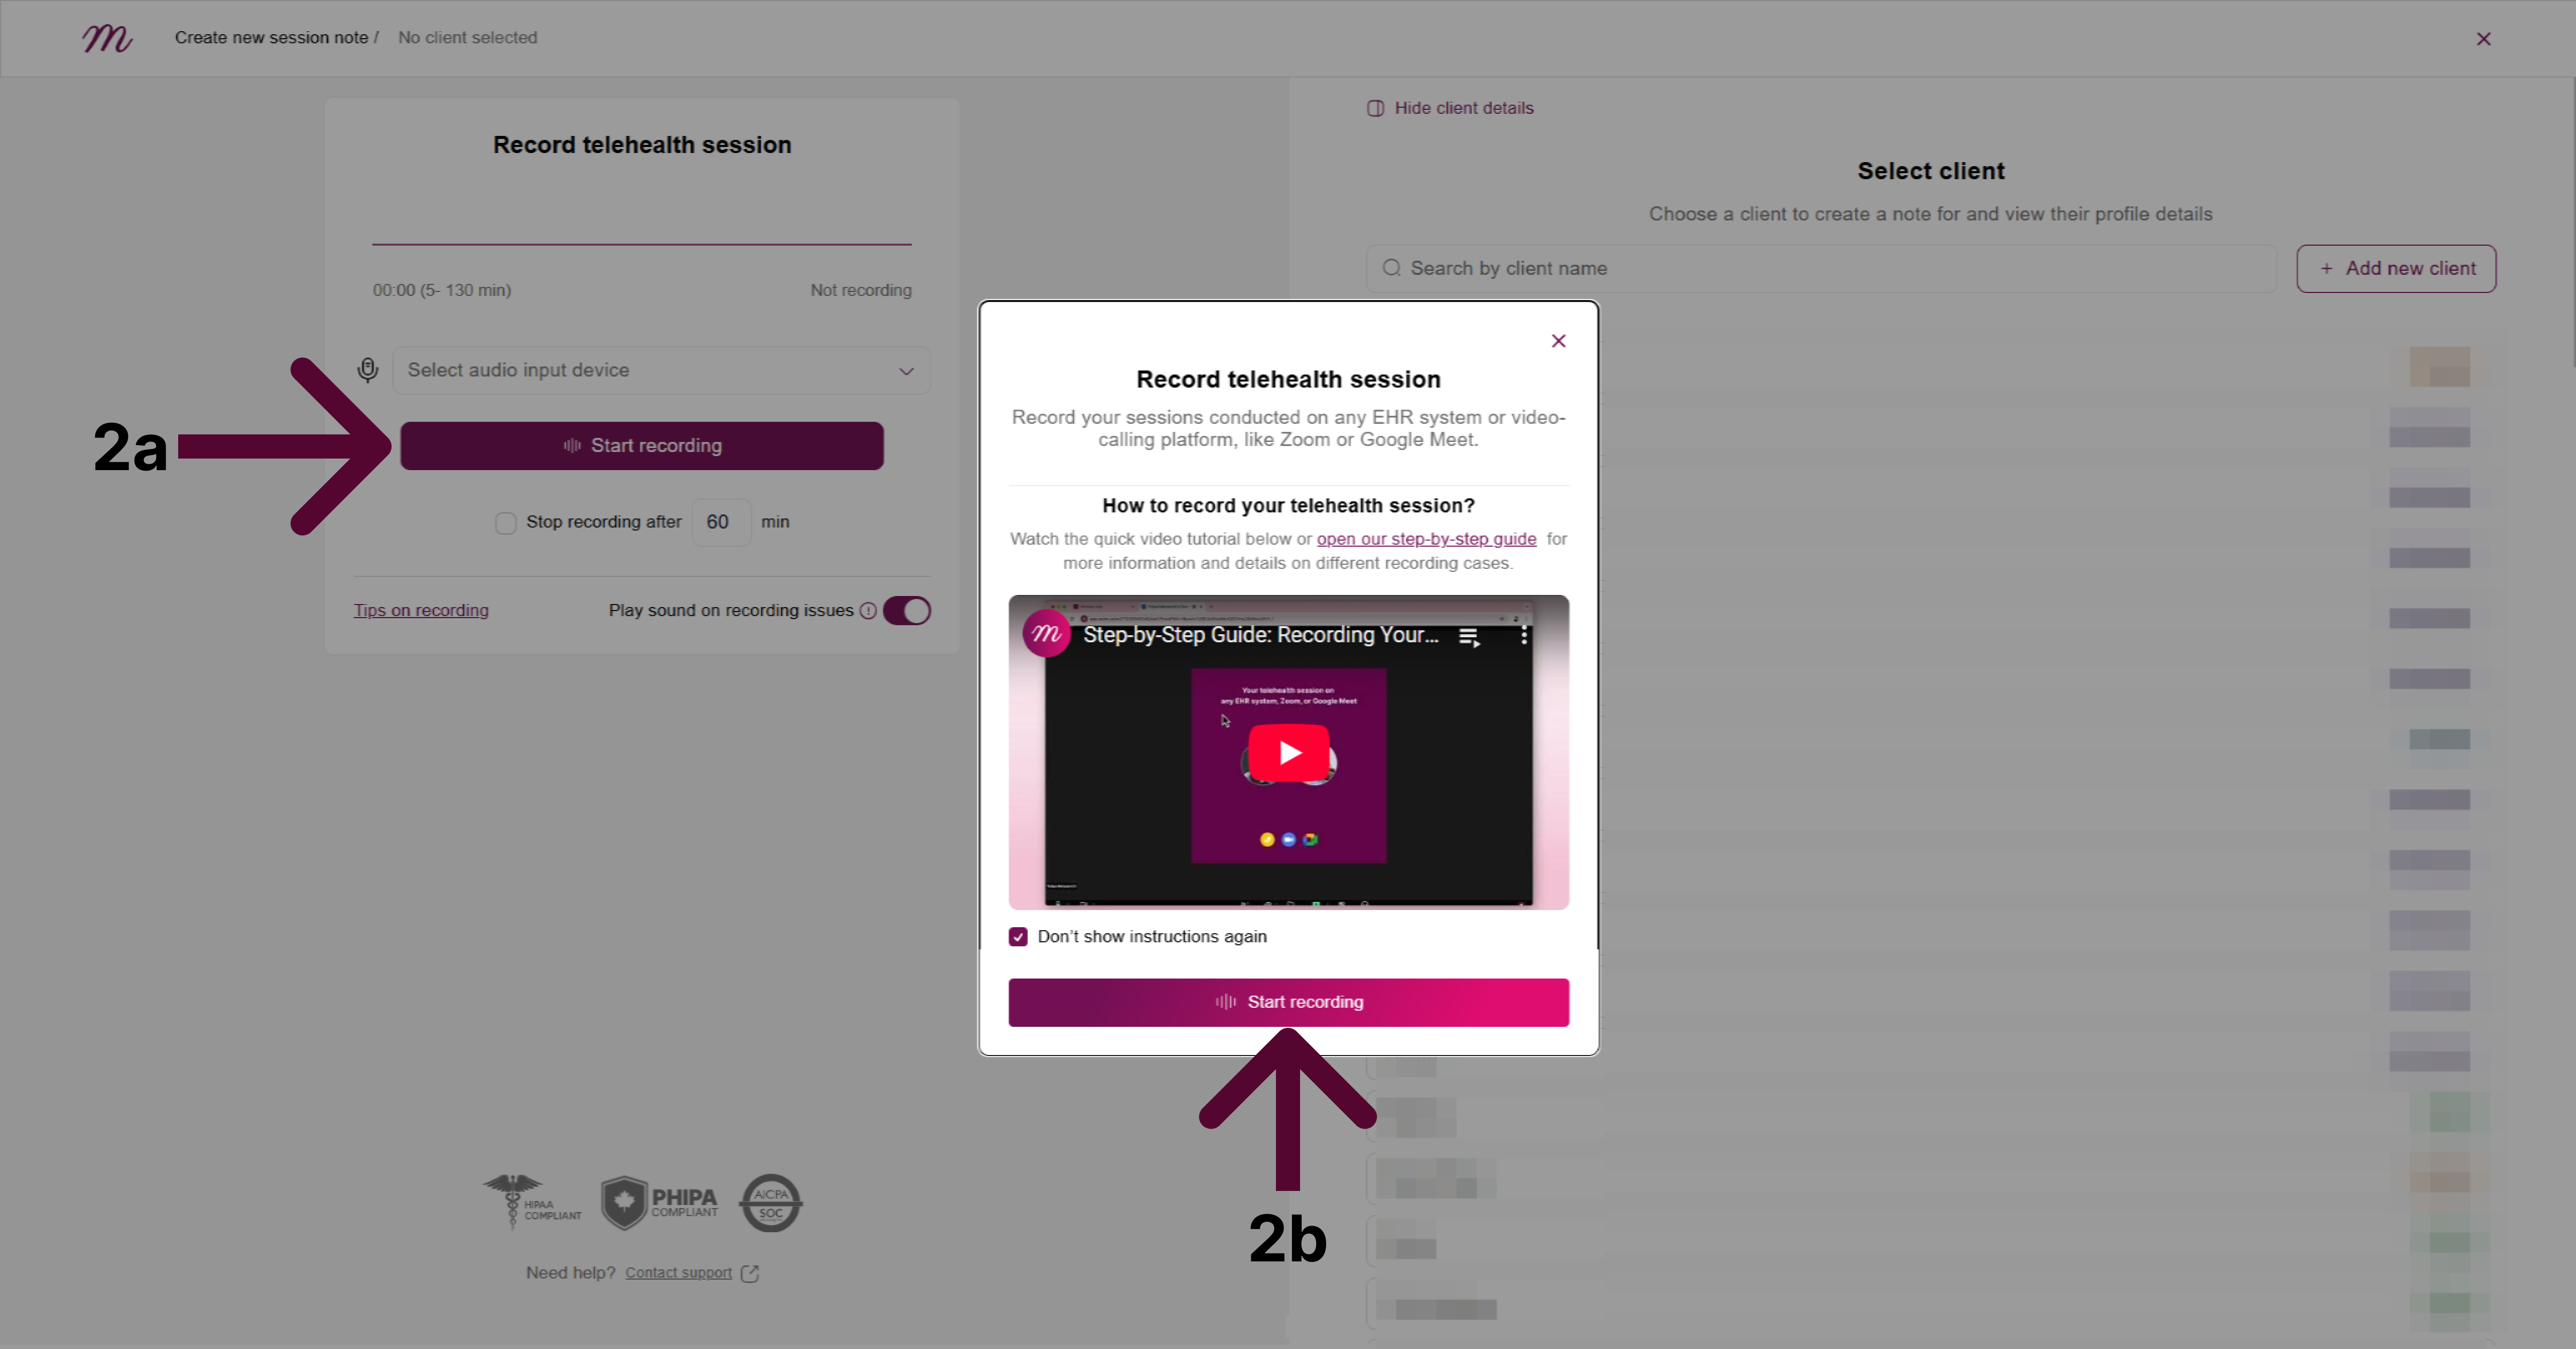
- If it's your first time, your browser will ask for permission to use your microphone. You must click "Allow" to proceed.
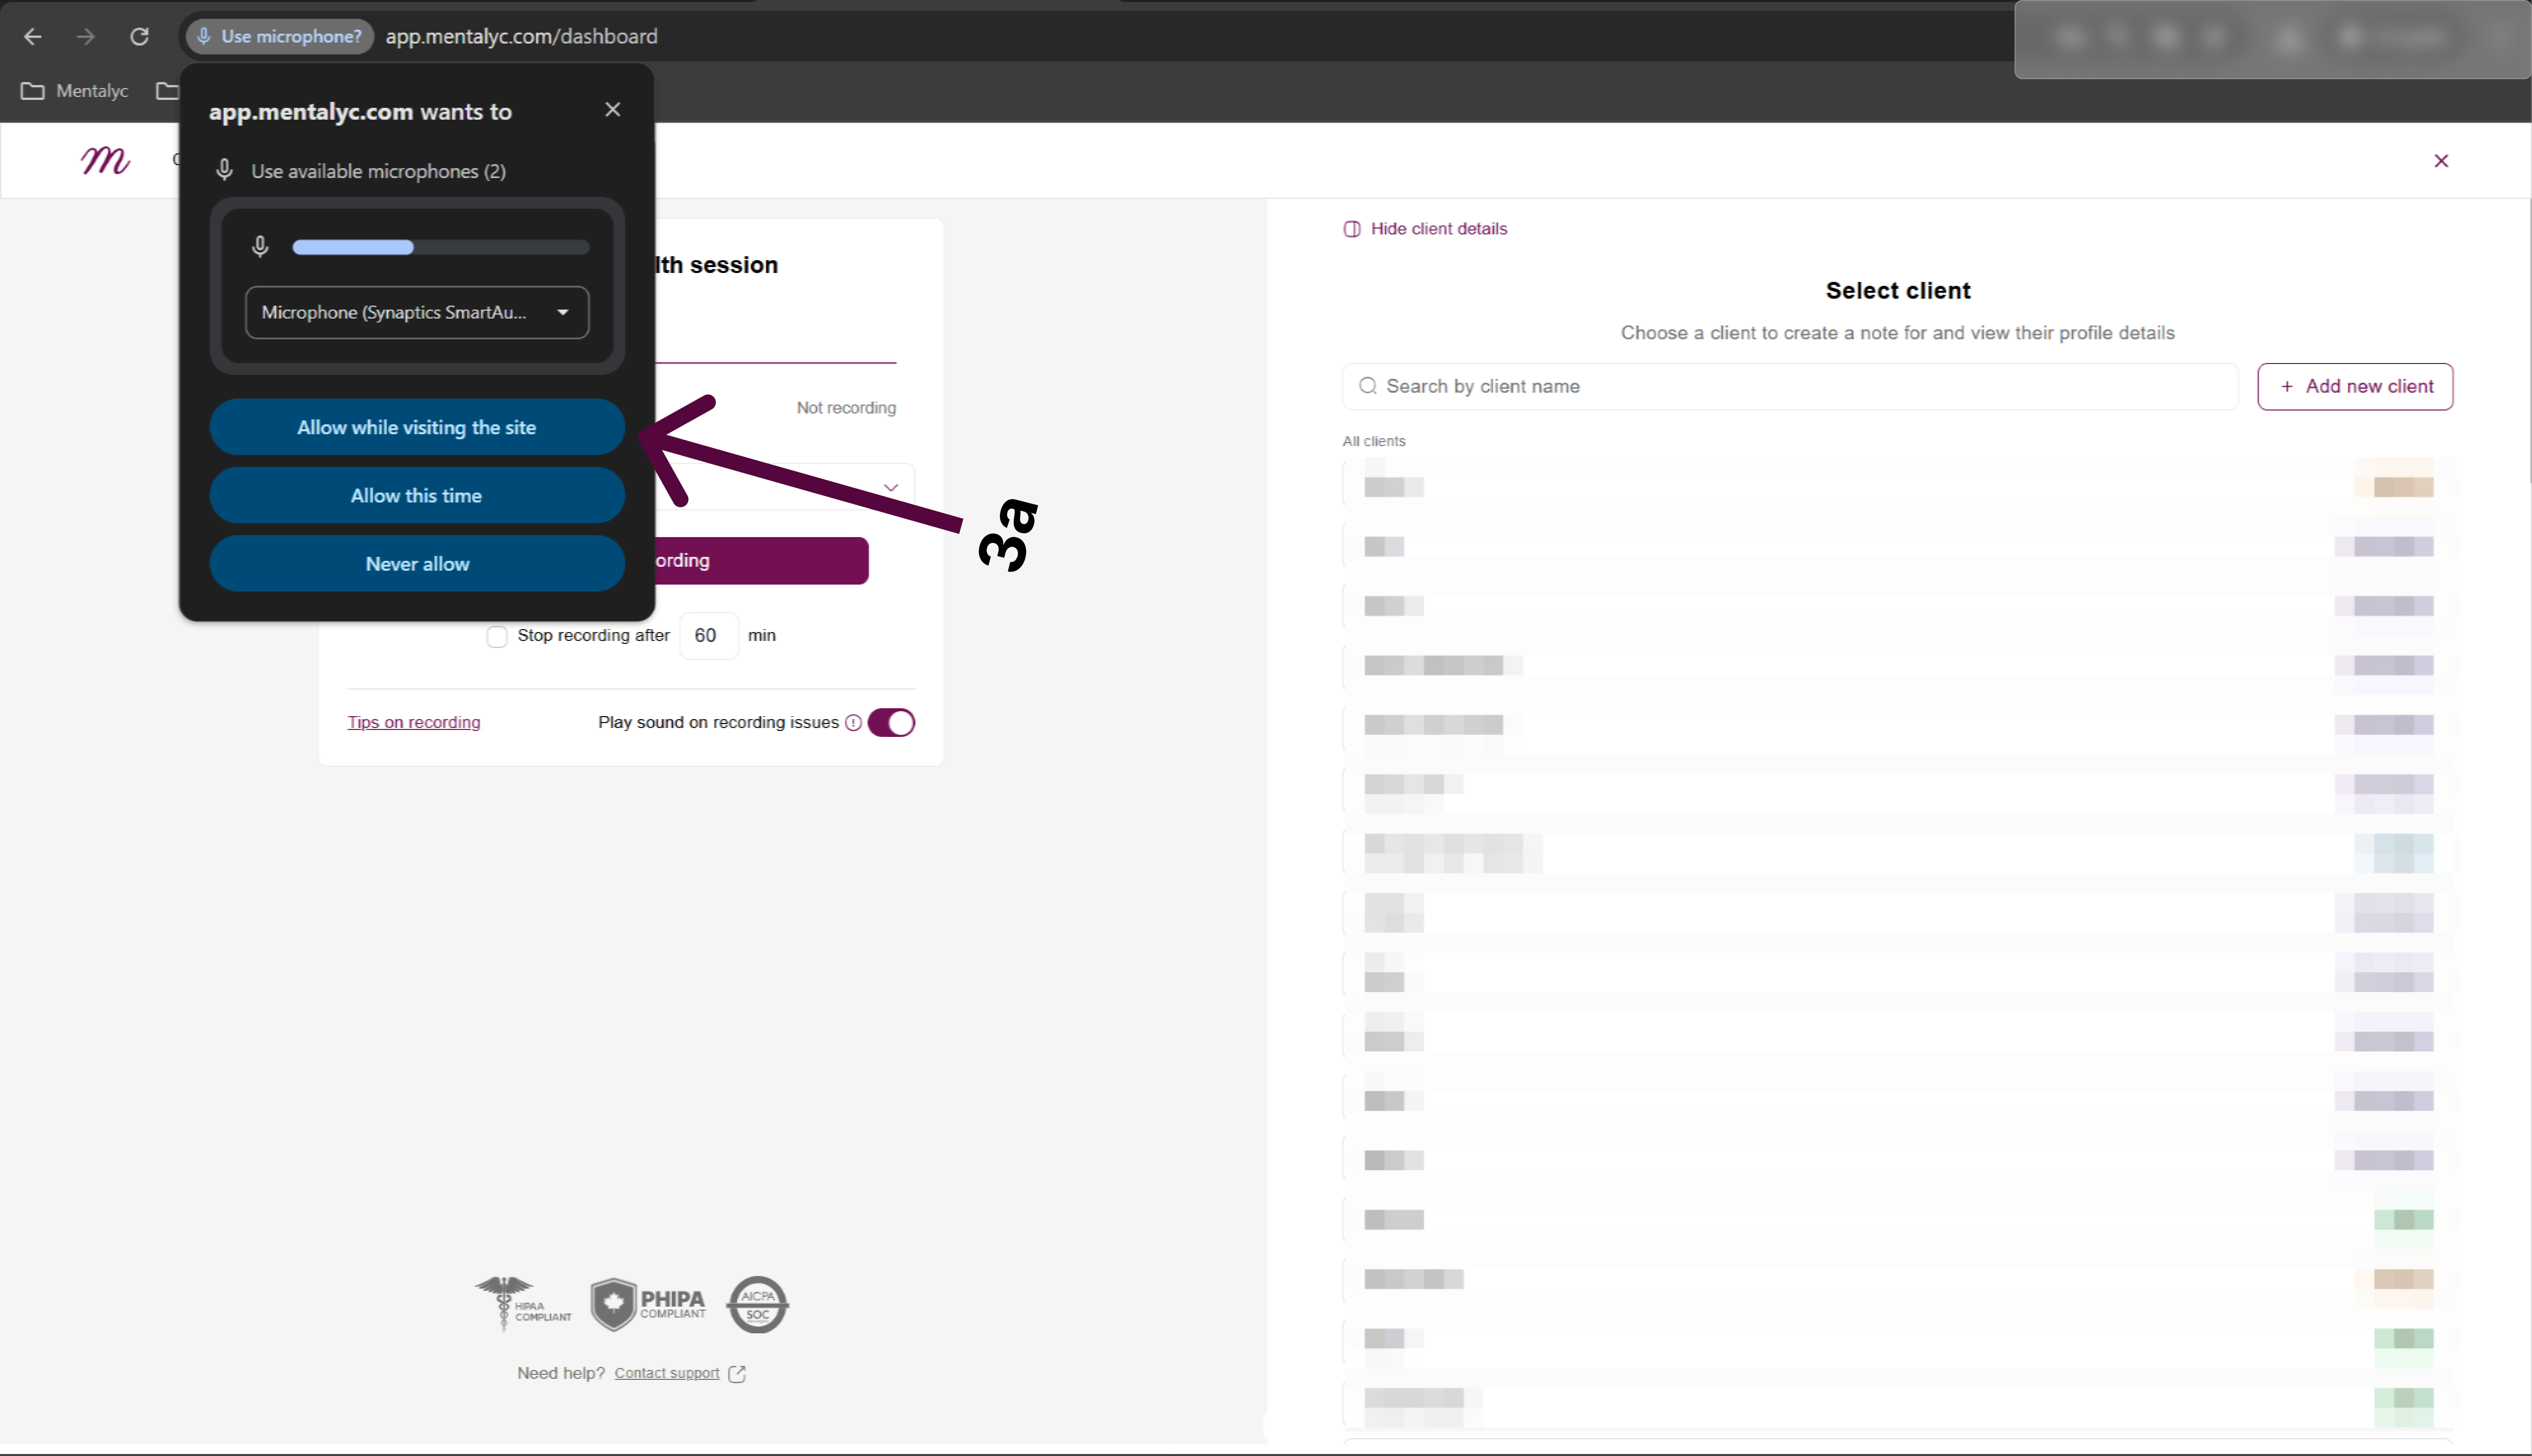
- Did you accidentally click "Block"? If so, the recording will fail. Please see the Troubleshooting: Microphone Access Was Denied section for instructions on how to fix this.
Part 2: Capturing Session Audio
This is the most critical part of the process.
Step 4: Share Your Telehealth Audio
Your browser will now ask you which part of your screen you want to share audio from. You can choose to share a Chrome Tab, a Window, or your Entire Screen. For the most reliable results, we recommend using the Chrome Tab option.
No matter which option you choose, you must perform these two critical actions:
- Click on the specific tab, window, or screen that is running your telehealth session.
- Check the box at the bottom that says "Share tab audio" or "Share system audio".
- Click the Share button to begin.
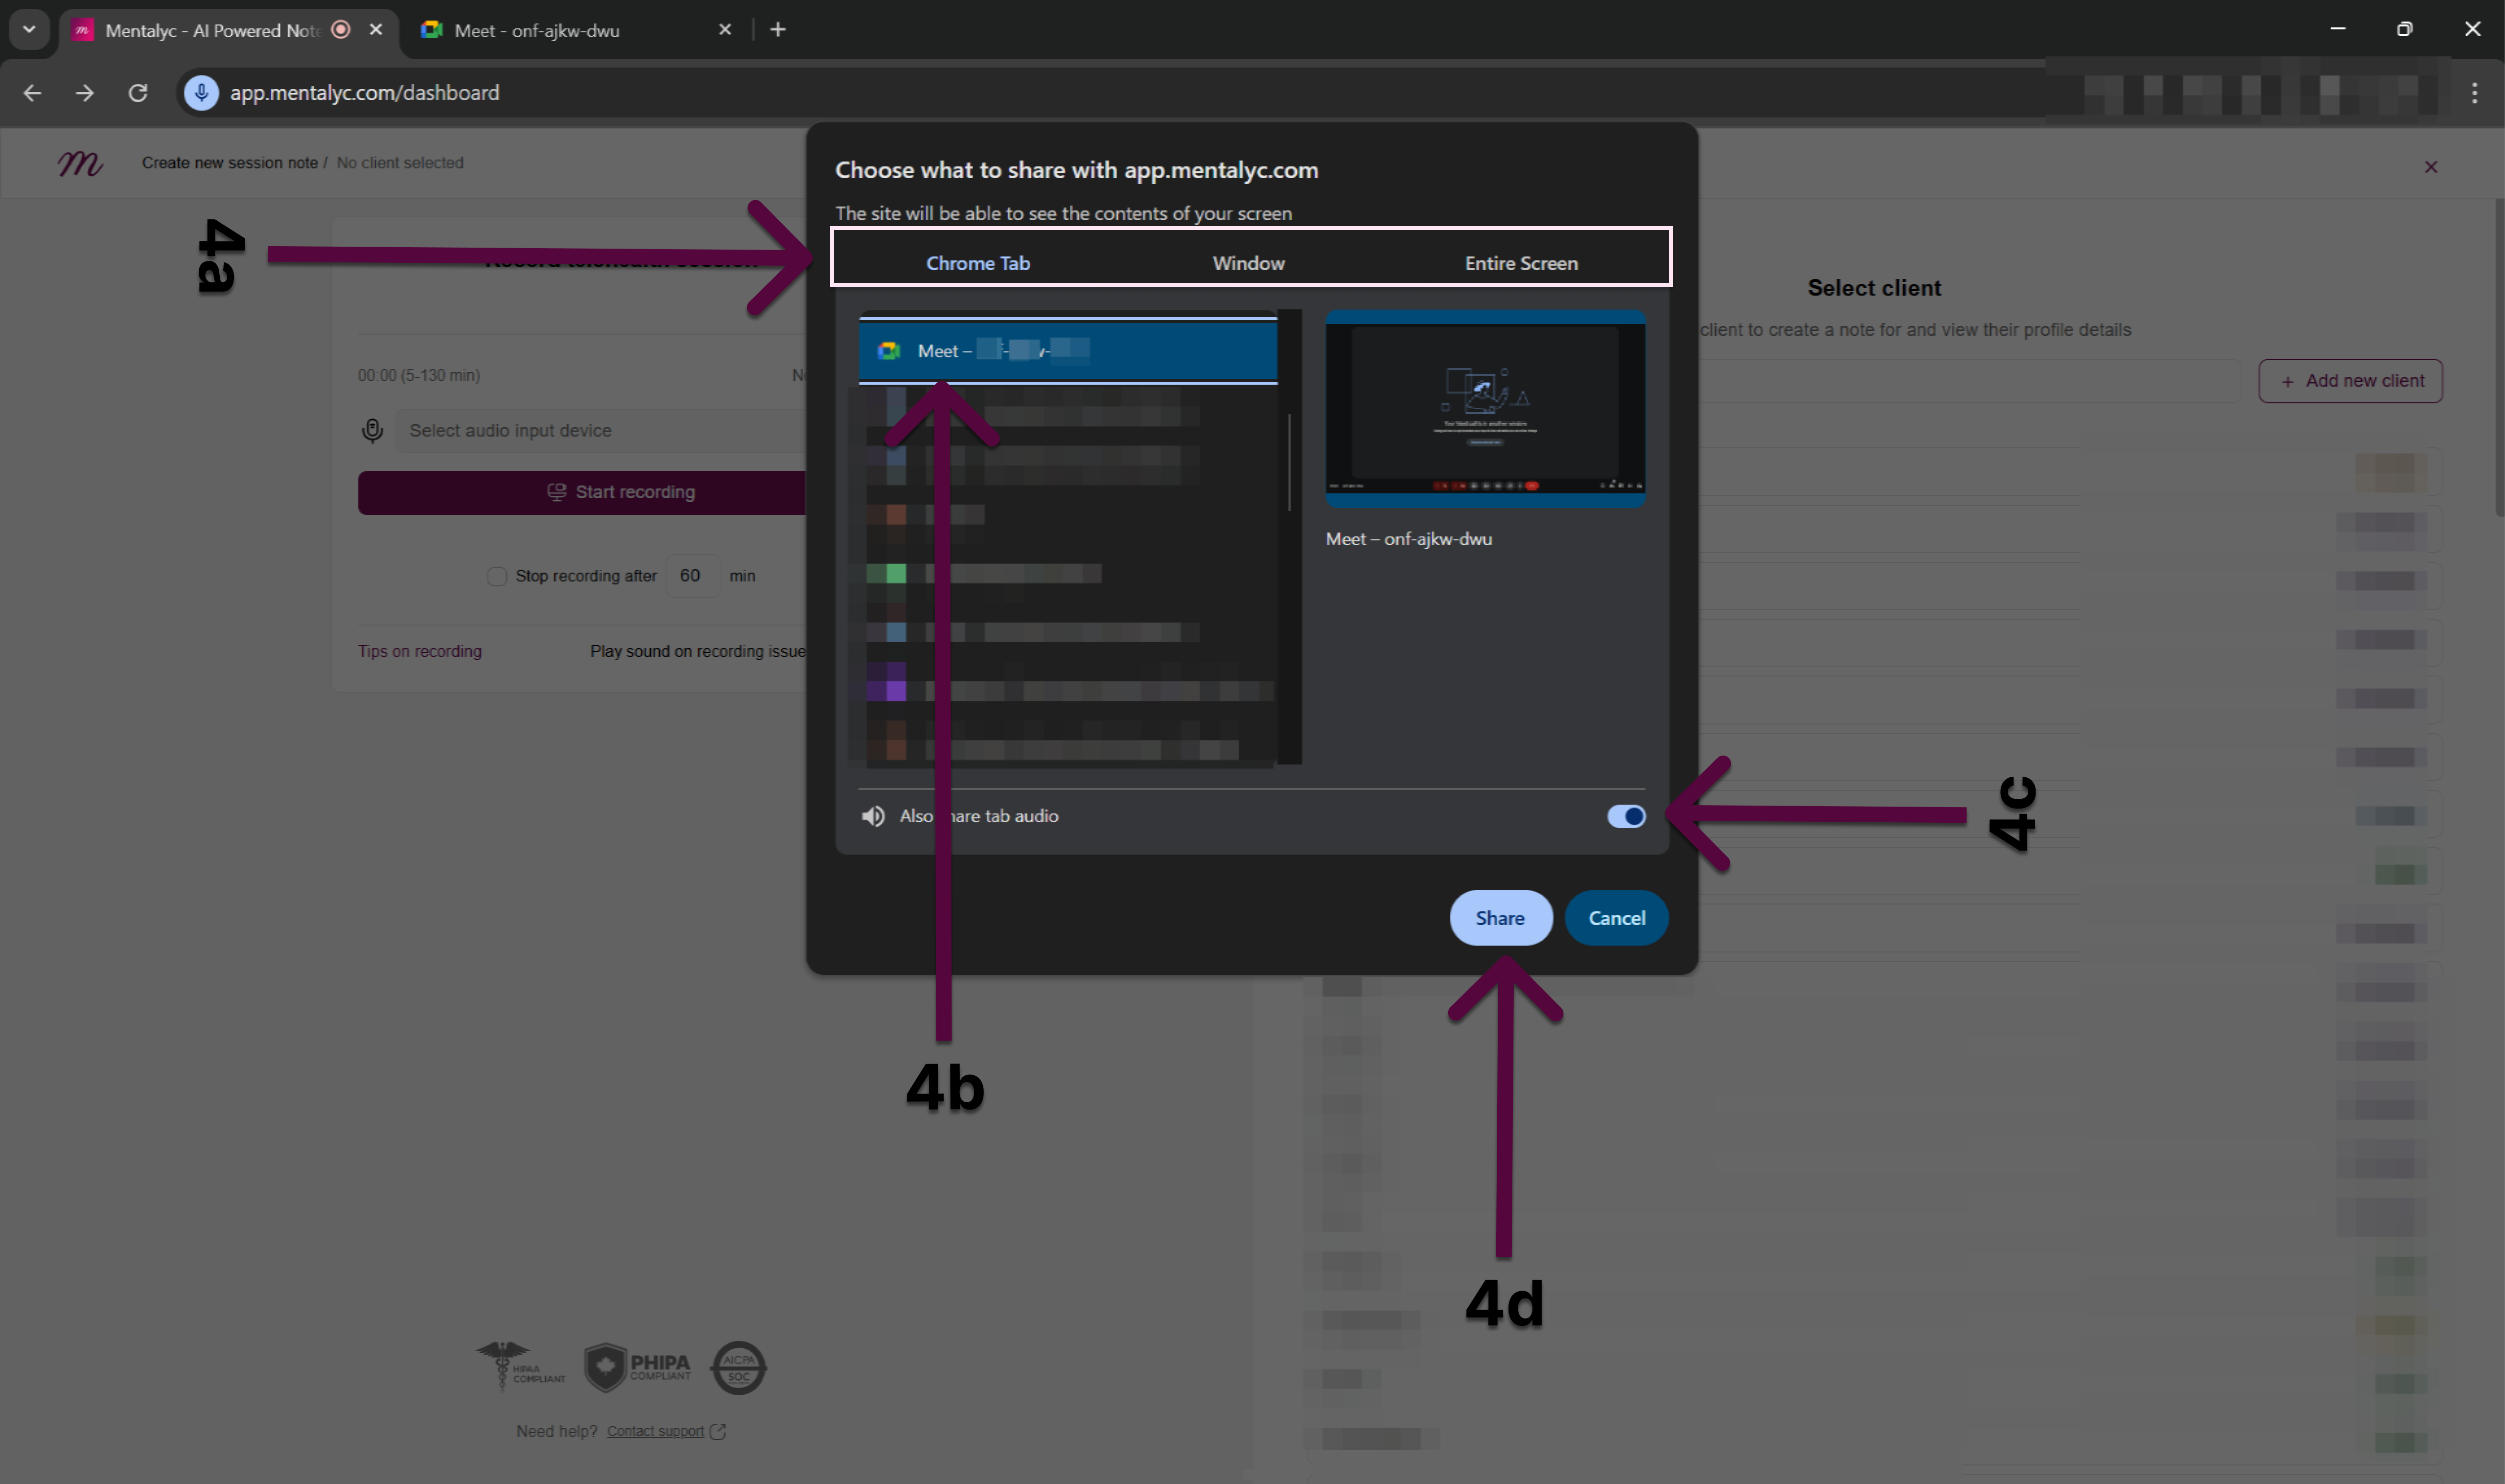
Critical Steps for Success:
- You must enable the "Share tab audio" toggle, or only your voice will be recorded.
- For MacBook Users: Ensure the Mentalyc tab and your telehealth session tab are in the same browser window. Due to privacy restrictions on Apple Mac devices, the browser will not be able to capture audio from other windows or the entire screen.
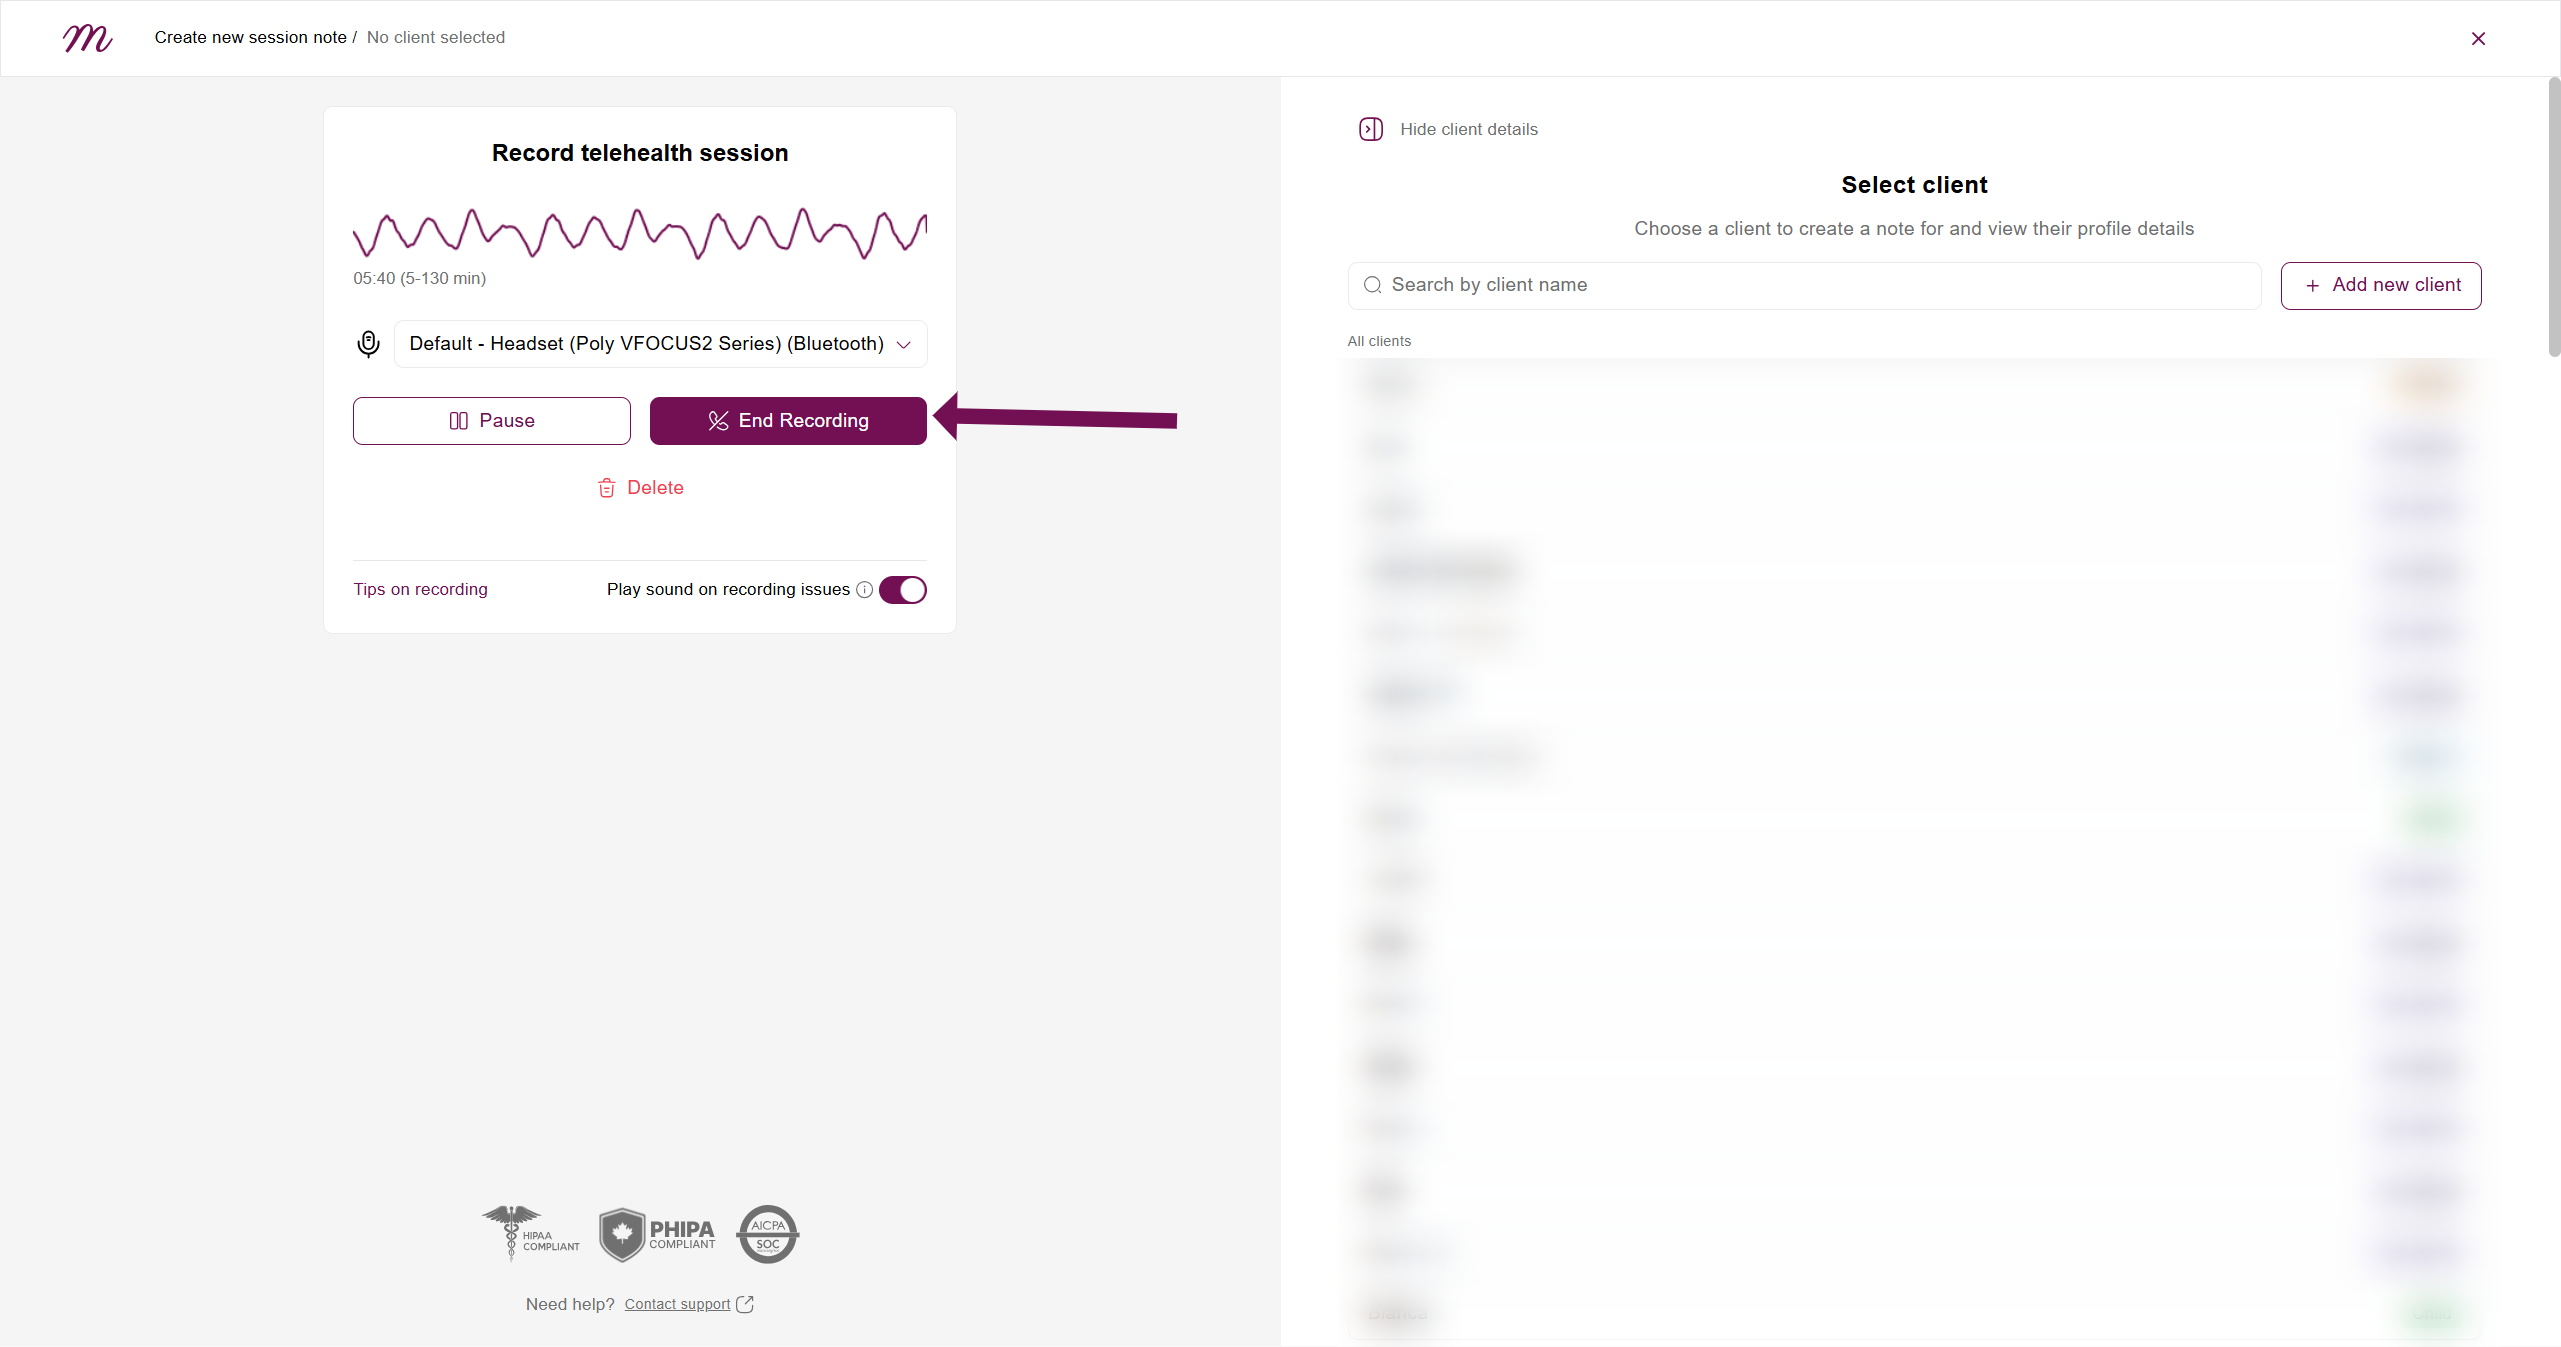
Step 5: Verify the Recording
Once recording, watch the live audio graph.
- If the graph only moves when you speak, there is an issue with the audio sharing setup.
- If the graph doesn't move when you (the provider) speak, there is an issue with your microphone.

Step 6: End the Recording
When your session is complete, click the End Recording button. You must record for a minimum of 5 minutes before this button becomes active.
Part 3: Generating Your Note
Step 7: Review and Configure
- On the review screen, you can play, download, or delete the audio.
- Assign the session to a Client.
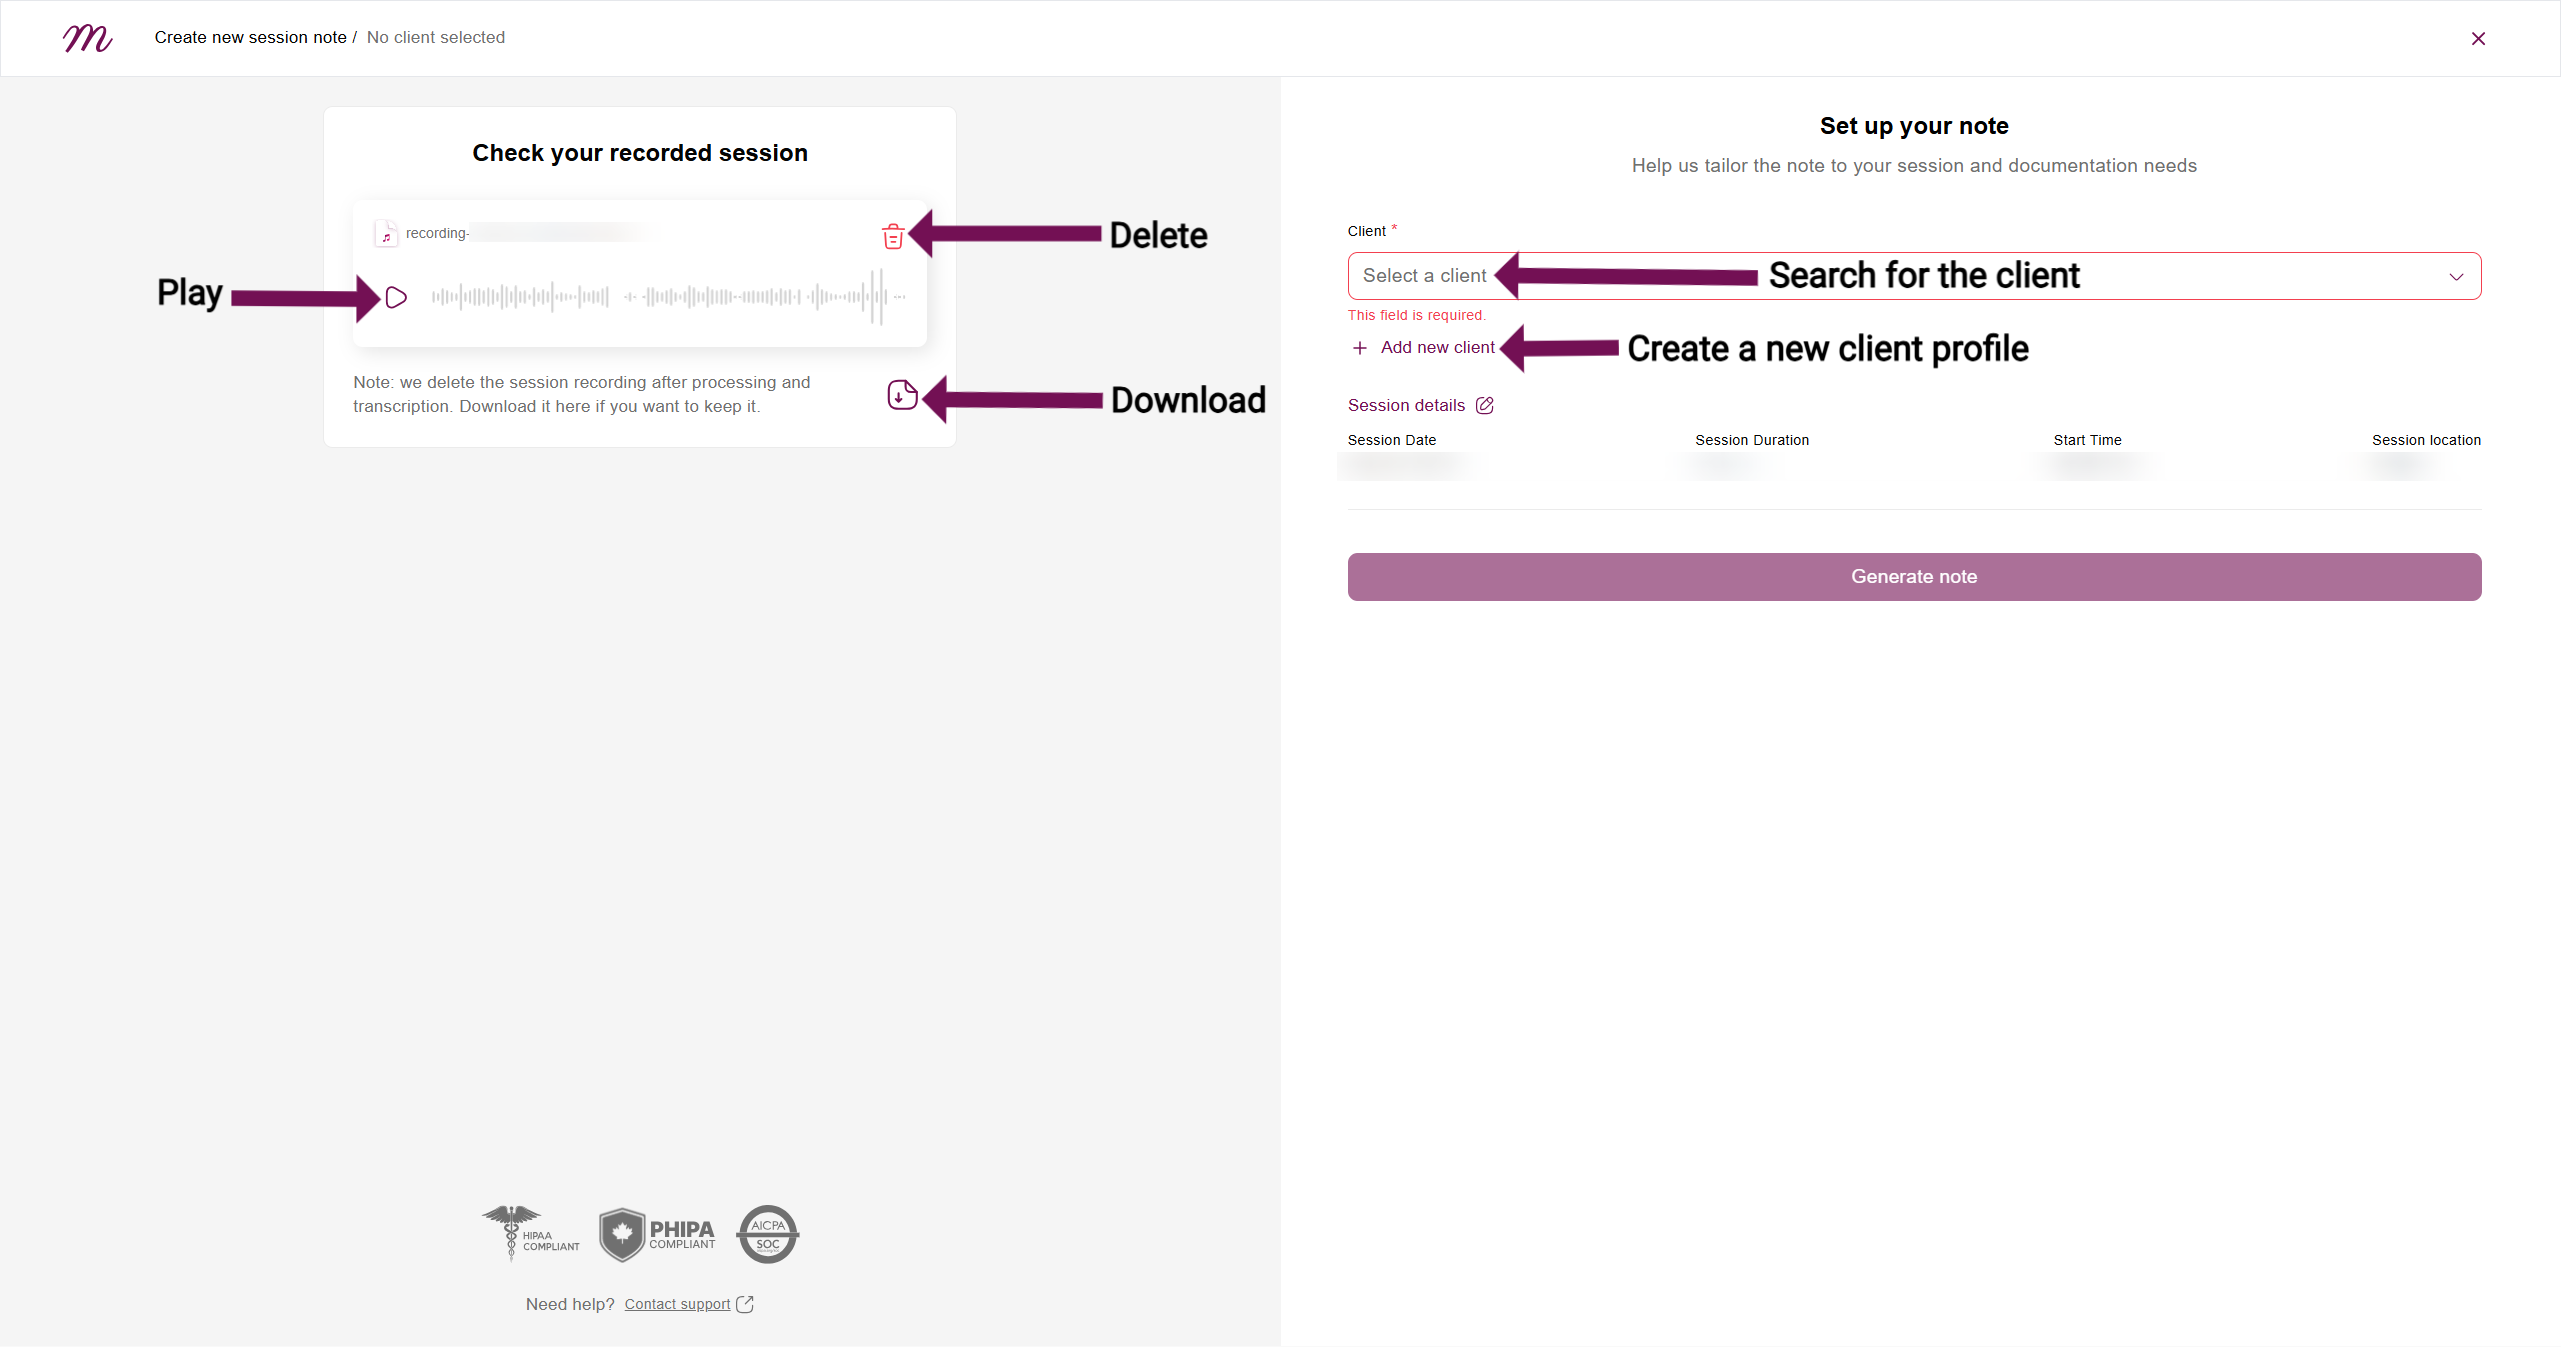
- Select your preferred Note Type, Template, and Approaches and modalities.

- Click Generate Note. Once you do, the session will begin uploading and generating on your dashboard. During the uploading process, ensure you remain on the browser tab. You will be notified when it is safe to close the tab. Once the session has generated, you can open the note by clicking the new session note card.

Troubleshooting and Alternative Methods
Troubleshooting: Recording Zoom Sessions
The "Record Telehealth" feature may have trouble capturing audio from a desktop Zoom application. Use one of these methods instead.
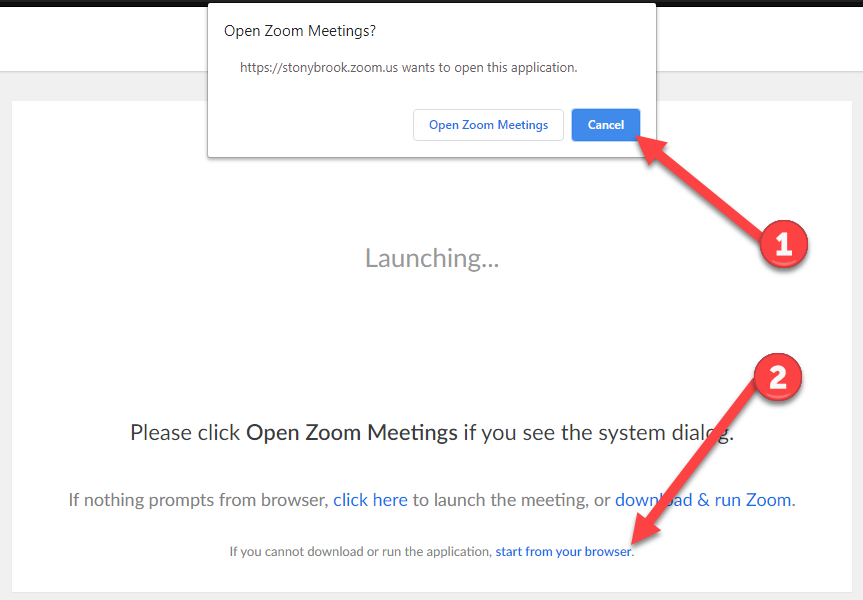
- Recommended Method: Join Zoom in Your Browser
- Click your Zoom meeting link. When the pop-up asks to open the Zoom app, click "Cancel".
- On the page, click the "Join from Your Browser" link. Your Zoom session is now a regular browser tab that Mentalyc can record.
- Alternative Method: Use Zoom's Built-in Recorder
- Use Zoom's built-in function to record the meeting to your computer. You can watch this short video tutorial on how to use Zoom's recording features.
- After the meeting, use the "Upload File" method in Mentalyc to upload the audio file.
Recording on a Mobile Device (Device-to-Device Method)
While the "Record Telehealth" feature is not yet on mobile, you can use this reliable method to capture your sessions. You will need two separate devices.
- Telehealth Device: The device where the session is being held (e.g., your tablet or phone).
- Recording Device: The second device you will use to capture the audio (e.g., your phone).
- On your Telehealth Device, start the session and turn the speaker volume to the loudest setting.
- On your Recording Device, place it near the speaker of the Telehealth Device.
- Open a voice recording app on the Recording Device. You can use your phone's built-in app (like Voice Memos / Recorder) or the Mentalyc "Record In-Person" feature.
- Start recording. Be sure to run a quick test to ensure you can clearly hear both your voice and the client's voice from the speaker.
- When the session is over, stop the recording.
- Use the "Upload File" feature on your Recording Device to upload the new audio file to Mentalyc.
- After the note is generated, you can securely delete the recording from your device.
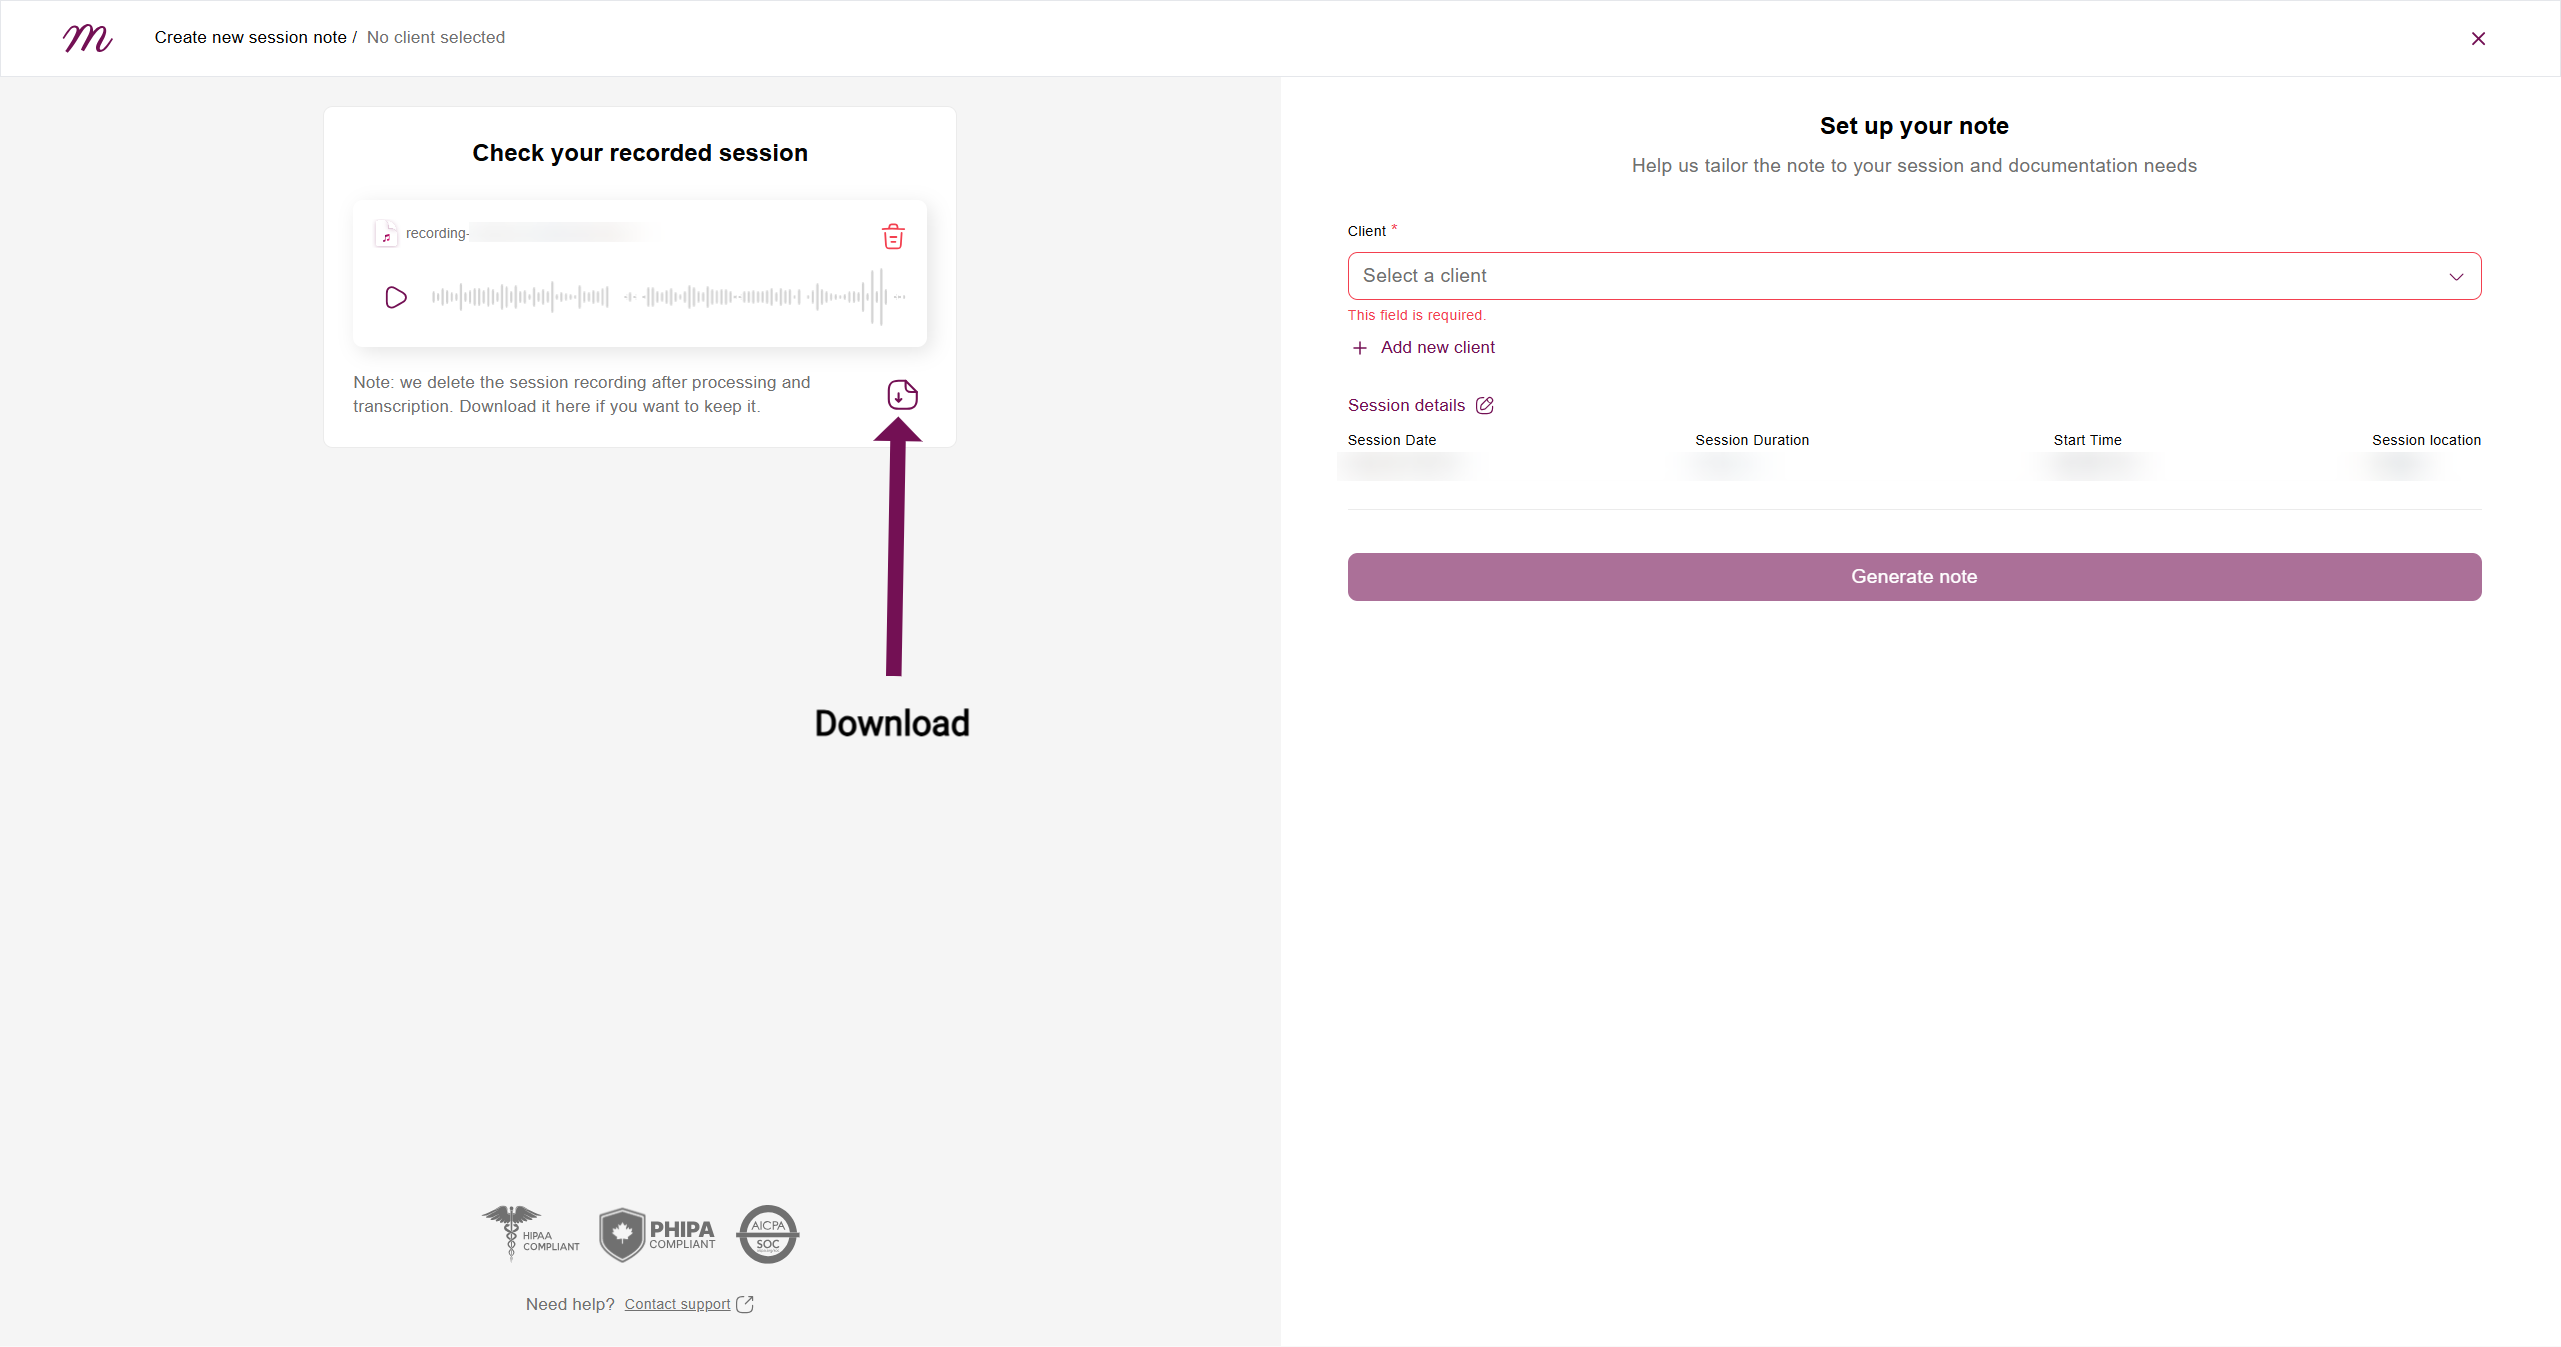
Downloading Your Session Audio
When you end a recording, you have the option to download the audio file. This is useful for backups or re-uploading later.
Troubleshooting: Locating Downloaded Sessions on Apple Mobile Devices

Important: Once a note is generated, the audio file is permanently deleted from your browser's memory for security. You can always review the full session transcript in the note's sidebar.
Troubleshooting: Microphone Access Was Denied
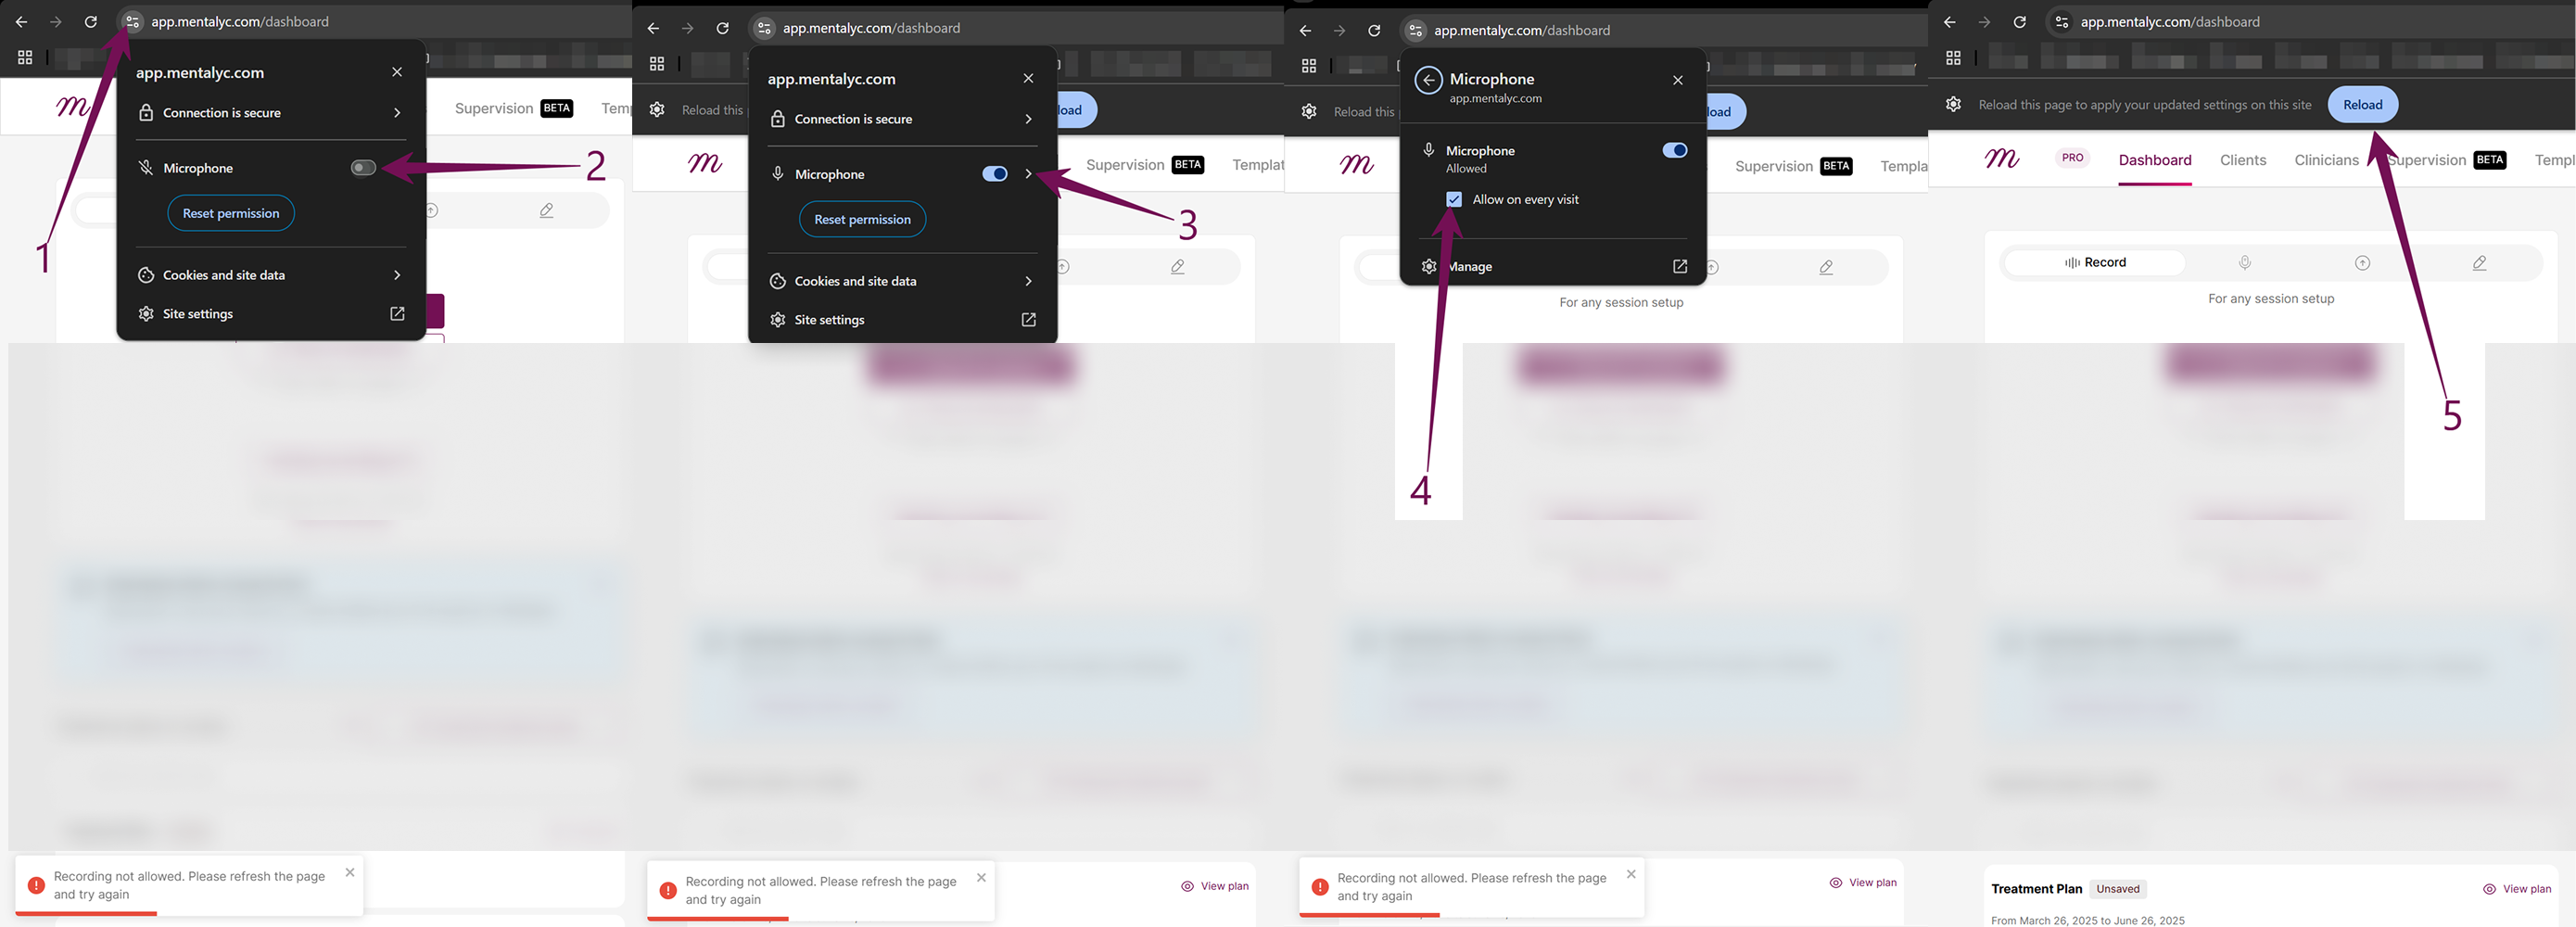
If you accidentally click "Block" or "Don't Allow" when Google Chrome asks for microphone permission, the recording will not be able to start. You will need to manually re-enable access.
For Chrome on a Computer (Windows & Mac)
If you see the "Recording not allowed" error, you must change your browser's site settings.
1. In Chrome, click the three-dot menu (⋮) in the top-right corner and go to Settings.
2. Click on "Privacy and security" on the left menu, then select "Site settings".
3. Under the "Permissions" section, click on Microphone.
4. Look for mentalyc.com under the "Not allowed to use your microphone" list.
5. Click on it, find the Microphone permission, and change it from "Block" to "Allow".
6. Refresh the Mentalyc page and try recording again.
Important Extra Step for Mac Users:
In addition to the browser settings, you must also check your main system settings.
1. Click the Apple logo in the top-left corner and go to "System Settings...".
2. Click on "Privacy & Security", then select "Microphone".
3. Make sure the toggle next to Google Chrome is turned ON. If it's off, Chrome cannot access your microphone at all.
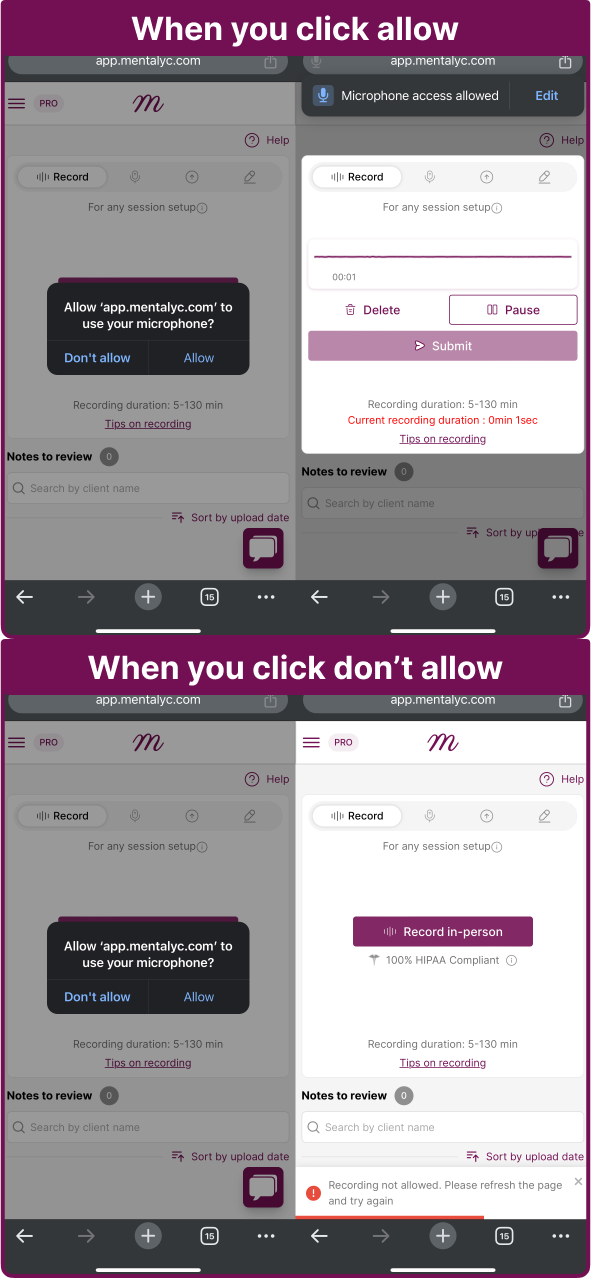
For Chrome on an iPhone
If you tap "Don't Allow," you will see an error. The fix is simple:
1. Refresh the webpage. You can do this by pulling down on the page.
2. The permission prompt will appear again. This time, tap "Allow". You will now be able to record.
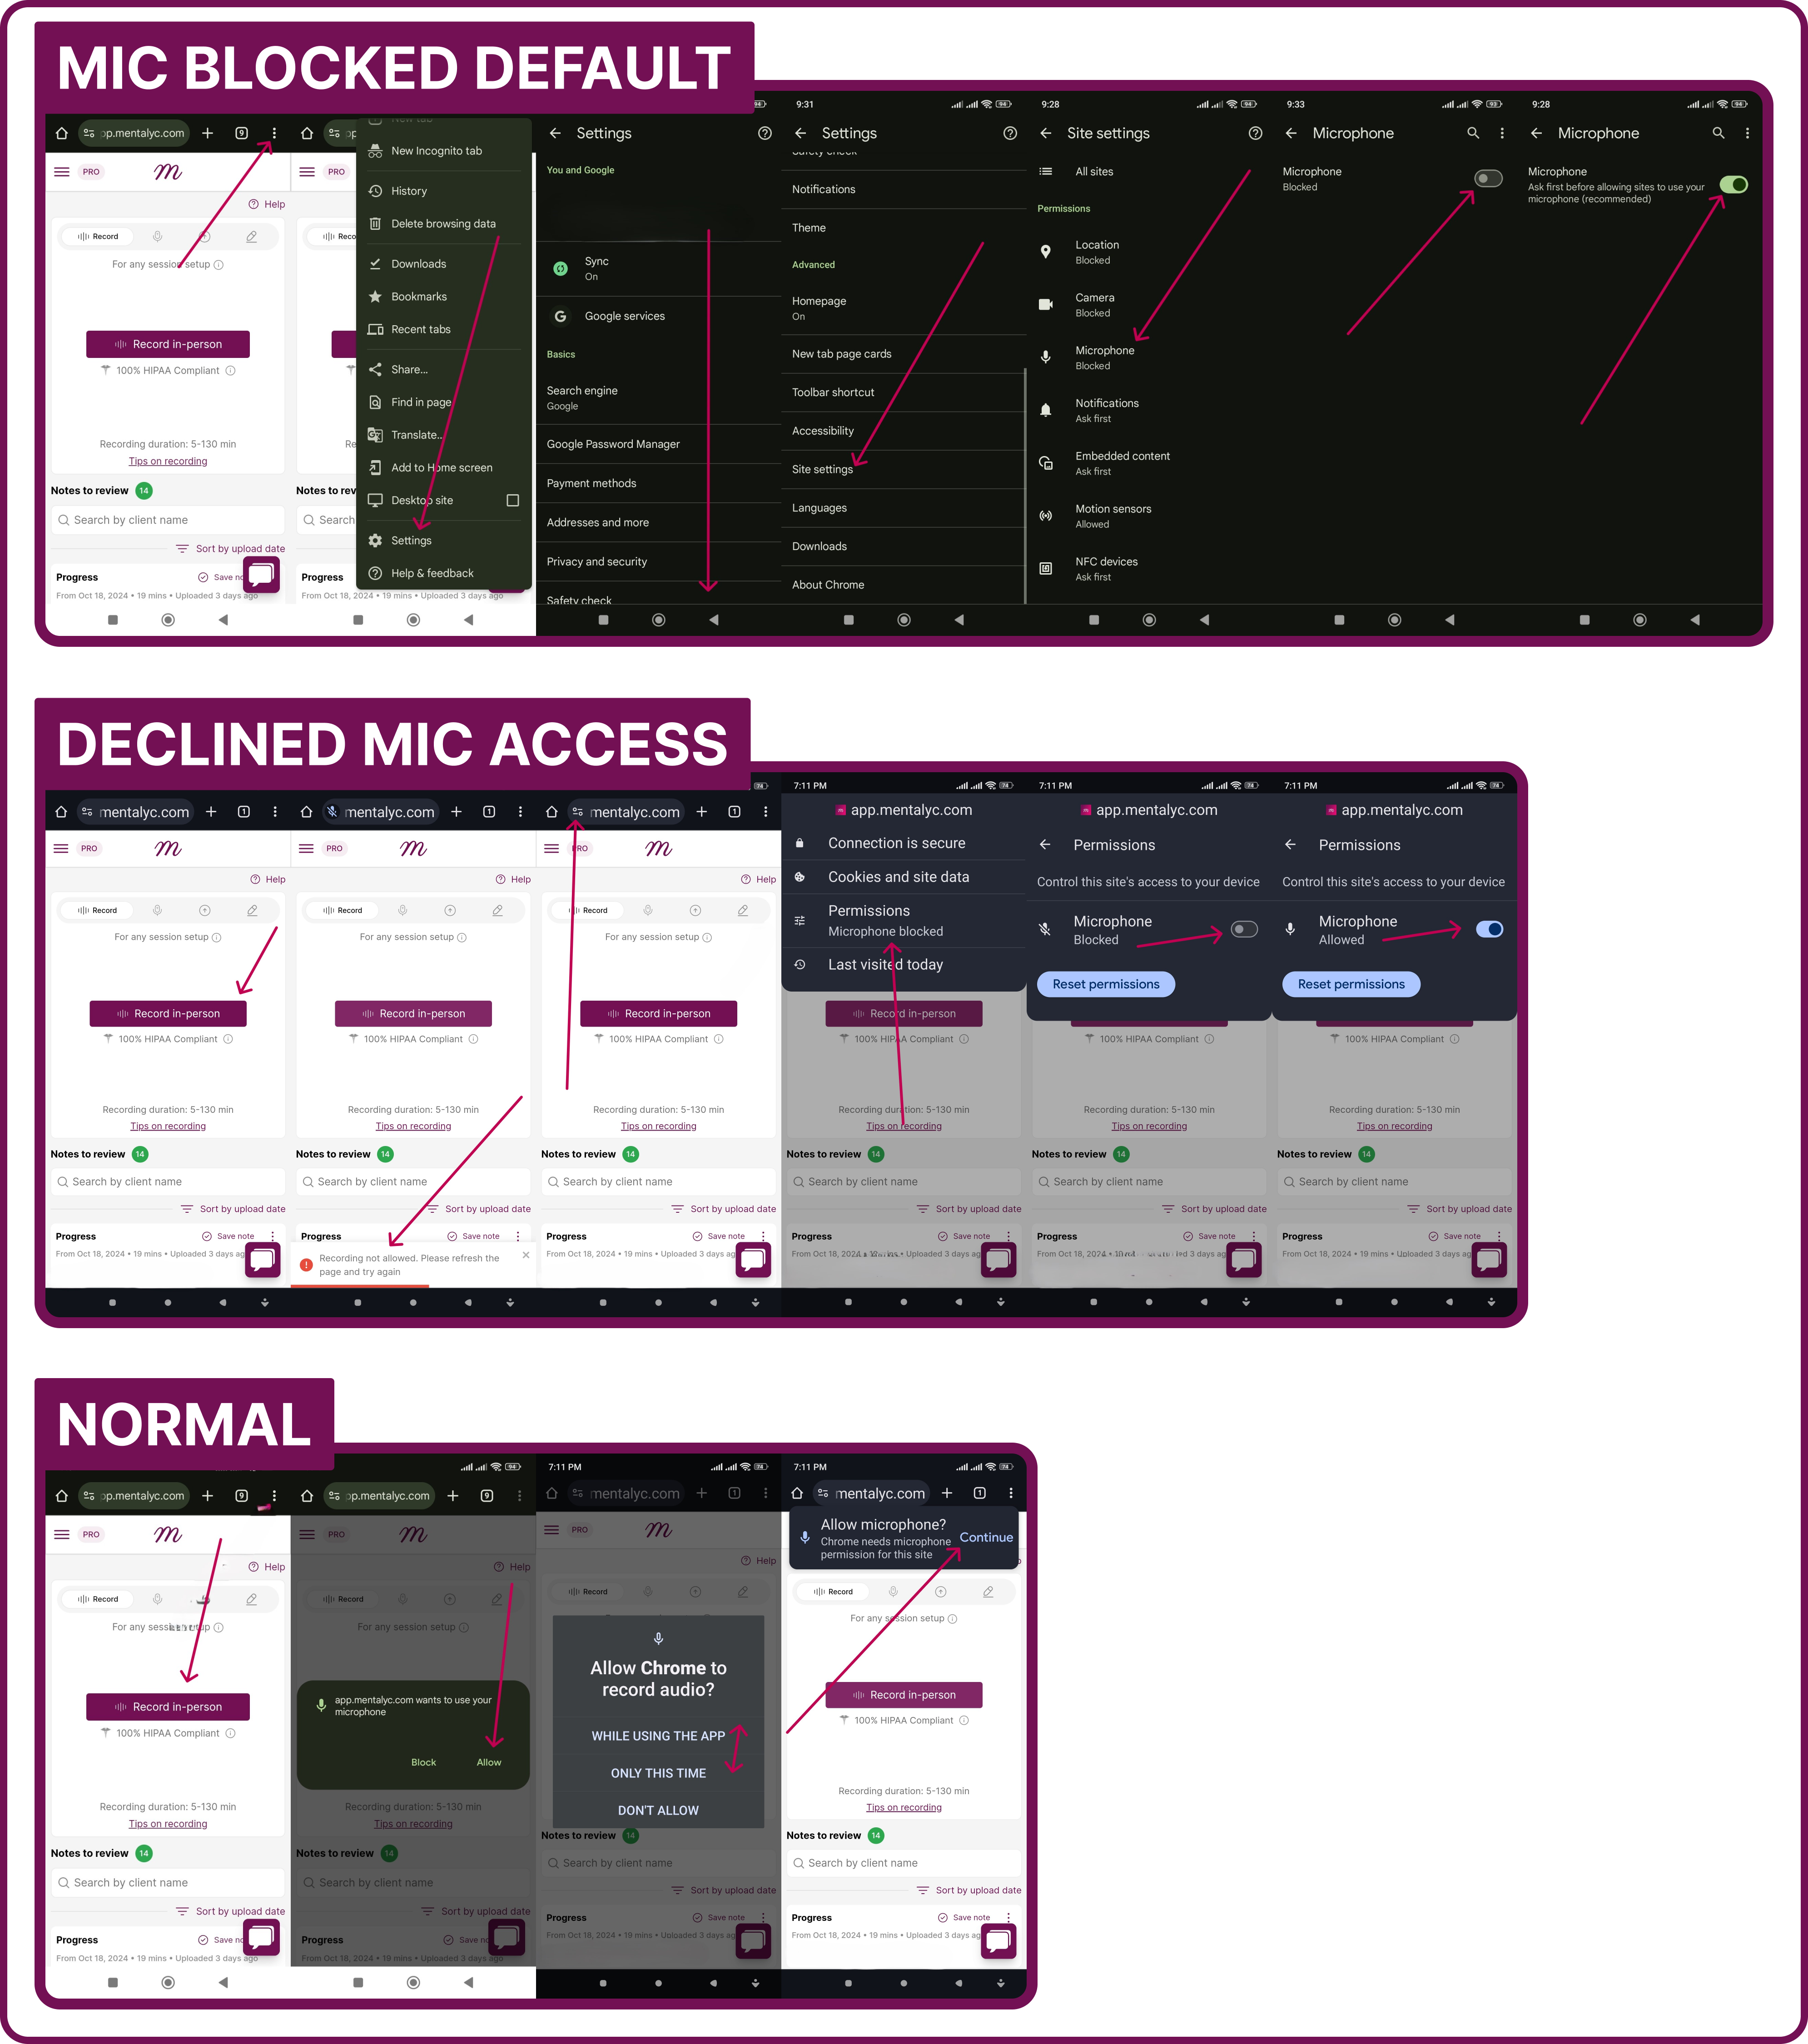
For Chrome on an Android Device
You will need to go into Chrome's site settings to fix a blocked microphone.
1. Open the Chrome app on your Android device.
2. Tap the three-dot menu (⋮) in the top-right corner and go to Settings.
3. Tap on "Site settings", then tap on "Microphone".
4. Look for mentalyc.com under the "Blocked" list.
5. Tap on it, and then tap on the Microphone permission and select "Allow".
Troubleshooting: Mac Microphone Switches to iPhone During Sessions
Some users may experience an issue where their Mac, when connected to the same Apple ID as their iPhone, automatically switches its microphone input to the nearby iPhone during a recording. This is caused by an Apple device syncing feature. If this happens, you can prevent it with the following steps.
How to Stop Your Mac from Using Your iPhone's Microphone:
- On your Mac, open System Settings.
- Click on Sound in the sidebar.
- Go to the Input tab at the top of the Sound window.
- Locate your iPhone in the list of input devices.
- Select it, and then click the minus (–) button at the bottom of the list to remove it.
This will prevent your Mac from automatically selecting your iPhone as a microphone during sessions.
How to Ensure a Successful Recording
Prevent Your Device From Sleeping: If your device's screen turns off or it goes to sleep, the recording will stop. Before your session, we strongly recommend adjusting your power settings. A simple way to do this is to set your device's power mode to "Best Performance" or ensure it is plugged into a power source.
For more specific settings:
How to Adjust Sleep and Power Settings on Your Device
For Windows:
- Go to:
Settings > System > Power & Battery > Screen and Sleep. - Set both "Turn off screen" and "Put my device to sleep" to Never (or a time longer than your session).
- For the best results, set your power mode to Best Performance.
For Mac:
- Go to:
System Settings > Displays > Advanced, and turn on "Prevent automatic sleeping when the display is off." - In
System Settings > Battery, also ensure sleep settings are extended or turned off.
For Android:
- Adjust screen timeout: Go to
Settings > Display > Screen timeoutand set it to the maximum time. - Disable battery restrictions for Chrome: Go to
Settings > Apps > Chrome > Batteryand set it to Unrestricted. - Turn off Battery Saver mode during your sessions.
For iPhone:
- Adjust auto-lock: Go to
Settings > Display & Brightness > Auto-Lockand set it to Never.
Pro-Tip: You can also use free tools like PowerToys Awake (Windows) or Amphetamine (Mac) to keep your computer awake during important sessions.
Keep the Browser Active and Visible: During a recording or upload, always keep the Mentalyc browser tab open and visible. Minimizing the browser window or switching to other apps that need the microphone can cause the recording to be interrupted.

If an Upload Fails: Go to Pending Recordings on the dashboard to download the audio file, then re-upload it using the "Upload File" method.

Troubleshooting: Locating Downloaded Sessions on Apple Mobile Devices
After a Power Outage: Restart your computer, open the same browser, and check the "Record Telehealth" box on your dashboard. Your recording may be there to continue or end.
Use an Optimized Browser: For the best and most stable performance, we strongly recommend using the latest version of Google Chrome or Microsoft Edge.
Still Need Help?
If you've followed this guide and are still experiencing issues, we are here to help. Please visit our Support and Feedback Form and let us know where you are getting stuck.
To help us resolve your issue as quickly as possible, please describe the hurdle you've encountered and attach a screenshot if possible. Once you submit the form, you will receive a ticket via email. You can reply to that email with a screen recording or video of the issue. This information will help us pinpoint the problem, provide you with tailored advice, or escalate it to the appropriate team.